By: Team AY1920S1-CS2103-F10-1 Since: Sep 2019 Licence: MIT
- Introduction
- Quick Start
- Features (as of v1.4)
- 1. Miscellaneous
- 2. Tabs
- 3. Patient Features
- 4. Appointments
- 4.1. Listing All Appointments:
appt-list - 4.2. Finding Appointment(s):
appt-find - 4.3. Adding an Appointment:
appt-add - 4.4. Editing an Appointment:
appt-edit - 4.5. Deleting an Appointment:
appt-delete - 4.6. Deleting an Appointment permanently:
appt-delete-permanent - 4.7. Deleting Multiple Appointments:
appt-delete[coming in V2.0] - 4.8. Deleting Multiple Appointments Permanently:
appt-delete-permanent[coming in V2.0] - 4.9. Displaying Finished Appointments
[coming in V2.0] - 4.10. Listing All Finished Appointments
appt-finished-list[coming in V2.0] - 4.11. Finding Finished Appointment(s):
appt-finished-find - 4.12. Finishing Appointment
appt-finish[coming in V2.0] - 4.13. Deleting Finished Appointment
appt-finished-delete[coming in V2.0]
- 4.1. Listing All Appointments:
- 5. Visit Management
- 6. Autocomplete
- 7. Data Saving, History, Undo, Redo
- 8. Importing and Exporting of Patient Data
- Tutorials / How-To Guide(s) (as of v1.4)
- Planned Feature(s) (coming in v2.0)
- 1. Login System & Security
[coming in v2.0]- 1.1. Enabling the Login System
login-enable[coming in v2.0] - 1.2. Disabling the Login System
login-disable[coming in v2.0] - 1.3. Changing the Login Pin
login-changepin[coming in v2.0] - 1.4. Locking the Application
login-lock[coming in v2.0] - 1.5. Changing Login Lock Timeout
login-timeout[coming in v2.0] - 1.6. Logging in / Unlocking the Application
[coming in v2.0] - 1.7. Data Encryption
[coming in v2.0]
- 1.1. Enabling the Login System
- 1. Login System & Security
- FAQ
Introduction
NurseTraverse is designed for community nurses who make home visits to their patients. It is a computer app that will allow nurses to keep track of their patients' data, appointments and visits. NurseTraverse is optimized for those who prefer to work with a Command Line Interface (CLI) while still having the benefits of a Graphical User Interface (GUI). Interested? Jump to the Quick Start to get started. Enjoy!
Quick Start
-
Ensure you have Java
11or above installed in your Computer. -
Download the latest
nurvetraverse.jarhere. -
Copy the file to the folder you want to use as the home folder for your NurseTraverse app.
-
Double-click the file to start the app. The GUI should appear in a few seconds.
-
Type the command in the command box and press Enter to execute it.
e.g. typingapp-helpand pressing Enter will open the help window. -
Some example commands you can try:
-
pat-list: lists all patients -
pat-addn/John Doe p/98765432 e/johnd@example.com a/John street, block 123, #01-01: adds a contact namedJohn Doeto NurseTraverse. -
pat-delete3: deletes the 3rd contact shown in the current list -
app-exit: exits the app
-
-
Refer to Features (as of v1.4) for details of each command.
Features (as of v1.4)
Command Format
-
Words in
UPPER_CASEare the parameters to be supplied by you e.g. inadd n/NAME,NAMEis a parameter which can be used asadd n/John Doe. -
Parameters are additional pieces of information required/used when running a command.
-
Items in square brackets are optional e.g
n/NAME [t/TAG]can be used asn/John Doe t/Diabeticor asn/John Doe. -
Items that are not in square brackets are required e.g.
n/NAMEfrom thepat-addcommand. -
Items with
… after them can be used multiple times including zero times e.g.[t/TAG]…can be used ast/Diabetic,t/Diabetic t/Feveretc. -
Parameters can be in any order e.g. if the command specifies
n/NAME p/PHONE_NUMBER,p/PHONE_NUMBER n/NAMEis also acceptable. -
Due to the number of commands, each command will follow the syntax of
ENTITY ACTION [PARAMETERS]. For example, if you wanted to delete a patient, you would do something likepat-delete 3.
2. Tabs
This application uses 3 tabs to display its main information: "Patients", "Current Visit" and "Appointments".
3. Patient Features
Patient Features
As a community nurse, you will often need to visit various patients at their homes. This section describes the features that will allow you to manage the list of patients and their information in the application. This section covers the management of patients and their data.
3.1. Listing All Patients: pat-list
You can see a list of all patients in the app by typing pat-list.
In the list displayed, each patient will have an index number which can then be used for other features that require you to select a patient by index e.g. pat-delete. Take note that a patient will be given the same index regardless of other display commands such as pat-find. However, this index may change if the pat-delete command is executed.
Format: pat-list
3.2. Finding patients by name: pat-find
You can find patients whose names contain any keyword of your choice using pat-find.
Format: pat-find KEYWORD [MORE_KEYWORDS]
Examples:
-
pat-find John
Returns patientsjohnandJohn Doe -
pat-find Betsy Tim John
Returns any patient(s) having namesBetsy,Tim, orJohn
3.3. Adding a Patient: pat-add
You can add a patient to the list of all patients by using pat-add.
Format: pat-add n/NAME p/PHONE_NUMBER e/EMAIL a/ADDRESS [t/TAG]… [vt/VISIT_TODO]…
| Visit Todos are described in further detail under Section 1, “Visit Tutorials / How-To Guide(s)”. |
Examples:
-
pat-add n/John Doe p/98765432 e/john@email.com a/John street, block 123, #01-01 -
pat-add n/Choong Siew Hwang p/91239876 a/22 College Avenue East; Singapore 138608 e/cho0ng@email.com t/Male vt/Check Blood Pressure -
pat-add n/Betsy Crowe t/friend e/betsycrowe@example.com a/Newgate Street p/12345678 t/Female vt/Check fridge for expired food vt/Check for bed sores
|
Patient identity
A patient is identified by three things: their name, phone number, and email. Two patient entries are said to have the same identity (and thus refer to the same person) when both of the following conditions are satisfied:
To prevent duplicates, there cannot be two patients with the same identity in the app at the same time. |
3.4. Editing a Patient: pat-edit
You can edit an existing patient in the app using pat-edit.
Format: pat-edit INDEX [n/NAME] [p/PHONE] [e/EMAIL] [a/ADDRESS] [t/TAG]… [vt/VISIT_TODO]…
| Refer to Section 1, “Visit Tutorials / How-To Guide(s)” for more on Visit Todos and Section 4, “Appointments” for more on Appointments. |
Examples:
-
pat-list
pat-edit 1 p/91234567 e/johndoe@example.com
Edits the phone number and email address of the 1st person in the entire patient’s list to be91234567andjohndoe@example.comrespectively. -
pat-edit 2 n/Betsy Crower t/
Edits the name of the 2nd person in the entire patient’s list withBetsy Crowerand clears all existing tags.
3.5. Deleting a Patient: pat-delete
You can delete a patient by index using pat-delete.
Format: pat-delete INDEX
Examples:
-
pat-list
pat-delete 2
Deletes the 2nd patient in the patient list. -
pat-delete 1
Deletes the patient which had been assigned the index 1.
Warning:
If pat-delete is successfully executed, the indexes of remaining patients may change. Please verify the index of the patient you are referencing after executing this command.
3.6. Clear all Patient data: pat-clear
You can clear all Patient data in the app using pat-clear.
Format: pat-clear
4. Appointments
Appointments
As a community nurse, you will often schedule appointments with your patients before visiting them, as well as keep track of these appointments you make with your patients. You can use the application to manage and keep track of these appointments. This section describes the features that will allow you to manage your appointments.
4.1. Listing All Appointments: appt-list
You can see a list of all appointments in the app by typing appt-list.
In the list displayed, each appointment will have an index number which can then be used for other features that require you to select an appointment by index e.g. appt-delete. Take note that an appointment will be given the same index regardless of other display commands such as appt-find.
The appointment list is sorted in increasing order of start date time of the appointments, i.e it shows the earlier scheduled appointments followed by the later ones.
Format: appt-list
4.2. Finding Appointment(s): appt-find
You can find appointments by patient name by typing any keyword of your choice following appt-find.
In the list displayed, each appointment will have an index number which can then be used for other features that require you to select an appointment by index e.g. appt-delete. Take note that an appointment will be given the same index regardless of other display commands such as appt-list or if different parameters are used.
Format: appt-find [PATIENT_NAME]
Examples:
-
appt-find James
Lists all appointments of that particular patient James
4.3. Adding an Appointment: appt-add
You can add an appointment to the list of all appointments by using appt-add.
Format: appt-add p/PATIENT_INDEX sdt/START_DATE_TIME edt/END_DATE_TIME [desc/DESCRIPTION] [ryr/RECUR_YEARS] [rmon/RECUR_MONTHS] [rweek/RECUR_WEEKS] [rday/RECUR_DAYS] [rhr/RECUR_HOURS] [rmin/RECUR_MINUTES]
Examples:
-
appt-add p/1 sdt/24-12-2019 1200 edt/24-12-2019 1400 desc/Medical checkup -
appt-add p/2 sdt/09-12-2019 1300 edt/09-12-2019 1330 ryr/1 rmon/3
4.4. Editing an Appointment: appt-edit
You can edit an existing appointment in the app using appt-edit.
Format: appt-edit INDEX [sdt/START_DATE_TIME] [edt/END_DATE_TIME] [p/PATIENT_INDEX] [desc/DESCRIPTION] [ryr/RECUR_YEARS] [rmon/RECUR_MONTHS] [rweek/RECUR_WEEKS] [rday/RECUR_DAYS] [rhr/RECUR_HOURS] [rmin/RECUR_MINUTES]
Examples:
-
appt-list
appt-edit 1 sdt/05-12-2019 1900 edt/05-12-2019 2000
Edits the start date time and end date time of the 1st person in the entire appointment’s list to be05-12-2019 1900and05-12-2019 2000respectively. -
appt-edit 2 p/3 ryr/1
Edits the second appointment to be associated with the third patient in the patient list. Also edits the appointment to recur by 1 year.
4.5. Deleting an Appointment: appt-delete
You can delete an appointment by index using appt-delete.
Format: appt-delete INDEX
Examples:
Assuming the first appointment in the list is a recurring appointment, and the second is a non-recurring one.
-
appt-delete 2
Deletes the 2nd appointment in the displayed appointment list. -
appt-delete 1
Deletes the 1st appointment in the displayed appointment list. Recurs the appointment and adds the new appointment with the next start and end date time to the appointment list.
4.6. Deleting an Appointment permanently: appt-delete-permanent
You can delete an appointment permanently by index using appt-delete-permanent.
You can use this command on both recurring and non-recurring appointments, but its use is more suited for recurring appointments since appt-delete and appt-delete-permanent work in the same way for non-recurring appointments.
Format: appt-delete-permanent INDEX
Examples:
Assuming the first appointment in the list is a recurring appointment, and the second is a non-recurring one.
-
appt-list
appt-delete-permanent 2
Deletes the 2nd appointment in the displayed appointment list permanently. -
appt-delete-permanent 1
Deletes the 1st appointment in the displayed appointment list permanently.
4.7. Deleting Multiple Appointments: appt-delete [coming in V2.0]
You can delete multiple appointments by indexes using appt-delete.
Format: appt-delete INDEX_1 [INDEX_2] [INDEX_3]…
Assuming the first appointment in the list is a recurring appointment, and the second is a non-recurring one.
Examples:
-
appt-delete 2
Deletes the 2nd appointment in the appointment list. -
appt-delete 1 2
Deletes the 1st and 2nd appointment in the appointment list. Recurs the 1st appointment and adds the new appointment with the next start and end date time to the appointment list.
4.8. Deleting Multiple Appointments Permanently: appt-delete-permanent [coming in V2.0]
You can delete an appointment by indexes using appt-delete-permanent.
You can use this command on both recurring and non-recurring appointments, but its use is more suited for recurring appointments since appt-delete and appt-delete-permanent work in the same way for non-recurring appointments.
Format: appt-delete-permanent INDEX_1 [INDEX_2] [INDEX_3]…
Examples:
Assuming the first appointment in the list is a recurring appointment, and the second is a non-recurring one.
-
appt-list
appt-delete-permanent 2
Deletes the 2nd appointment in the appointment list permanently. -
appt-delete-permanent 1 2
Deletes the 1st and 2nd appointments in the appointment list permanently.
4.9. Displaying Finished Appointments [coming in V2.0]
This is an intended additional UI and Storage feature.
Along with all the appointments that currently are in the appointment list, appointments that finished (were in the appointment list the previous time the app was run but are now before the system date and time and so removed from the appointment list) are displayed in a separate tab and also saved to another json file time the app is closed.
4.10. Listing All Finished Appointments appt-finished-list [coming in V2.0]
You can see a list of all finished appointments in the app by typing appt-finished-list.
In the list displayed, each finished appointment will have an index number which can then be used for other features that require you to select a finished appointment by index e.g. appt-finished-delete. Take note that a finished appointment will be given the same index regardless of other display commands such as appt-finished-find.
The finished appointment list is sorted in increasing order of start date time of the appointments, i.e it shows the earlier appointments followed by the later ones.
Format: appt-finished-list
4.11. Finding Finished Appointment(s): appt-finished-find
You can find finished appointments by patient name by typing any keyword of your choice following appt-finished-find.
In the list displayed, each finished appointment will have an index number which can then be used for other features that require you to select a finished appointment by index e.g. appt-finished-delete. Take note that an appointment will be given the same index regardless of other display commands such as appt-finished-list or if different parameters are used.
Format: appt-finished-find [PATIENT_NAME]
4.12. Finishing Appointment appt-finish [coming in V2.0]
Instead of deleting an appointment using appt-delete or appt-delete-permanent, you can use this command to simply mark an appointment as finished.
The appointment is removed from the appointment list and added to the list of finished appointments.
4.13. Deleting Finished Appointment appt-finished-delete [coming in V2.0]
You can delete (permanently) a finished appointment by index using appt-finished-delete.
There is no distinction in behaviour of this command between recurring and non-recurring appointments as deletion is from the finished appointment list.
Format: appt-finished-delete INDEX
Examples:
-
appt-finished-delete 2
Deletes the 2nd appointment in the finished appointment list. -
appt-finished-delete 1
Deletes the 1st appointment in the finished appointment list.
|
5. Visit Management
Visit Management
As a community nurse, you will often make home visits to your patients. When you are visiting a patient, there is often a todo list that you will have to do as well as information that you will have to record. This can now be done using the app. This section describes the features that will allow you to start a visit, keep track of your tasks during a visit, finish a visit and view information recorded during previous visits.
5.1. Starting a Visit visit-start
You can begin a visit by using visit-start. When you visit a patient and you want to record in the application that you are visiting said patient, you can use this feature to begin the visit for that patient (which will unlock the visit-now-update and visit-now-finish commands that will be applied to that visit). You can only have one ongoing visit at any point in time. This ongoing visit can be viewed in the "Current Visit" tab.
visit-start uses the patient’s Visit Todos to populate a checklist of Visit Tasks for you to use (these Visit Tasks are simply referred to as "tasks"). Visit Todos are described in further detail under Section 1, “Visit Tutorials / How-To Guide(s)”.
Format: visit-start PATIENT_INDEX
Examples:
-
visit-start 1
Starts a visit for the 1st patient in the patient list.
5.2. Updating the ongoing Visit visit-now-update
Once you have begun a visit using visit-start, the application will note that you have an ongoing visit. You can then update the details of this ongoing visit using visit-now-update.
Format: visit-now-update [d/TASK_INDEX DETAIL]… [f/TASK_INDEX]… [uf/TASK_INDEX]… [r/REMARK]
Example for visit-now-update:
Assume that you have an ongoing visit and 2 tasks (task 1 is "Check Blood Pressure", task 2 is "Check for bed bugs") in your visit checklist. After you’re done, you can update the application using:
-
visit-now-update d/1 140/90mmHg f/1 f/2 r/Patient is healthy
This sets the details for task 1 in the checklist to "140/90mmHg" and marks tasks 1 and 2 as finished. It also sets the remarks to "Patient is healthy".
Assuming then in the above scenario you discovered bed bugs after checking again before you leave. You decide to help the patient change the bedsheets and you want to update that information. You can run:
-
visit-now-update uf/2 r/Patient must be reminded to wash bedsheets regularly
This would set task 2 to unfinished and change the remarks. Once you have finished changing the bedsheets, you can then verify there are no bed bugs and use visit-now-update f/2 to mark task 2 as finished.
5.3. Cancelling the ongoing Visit visit-cancel
Once you have begun a visit using visit-start, the application will note that you have an ongoing visit. You can cancel that visit using visit-cancel, which will cancel the visit and remove it from the list of visits of the patient. The ongoing visit will also be removed from the Current Visit tab.
Format: visit-cancel
5.4. Finishing the ongoing Visit visit-end
Once you have begun a visit using visit-start, the application will note that you have an ongoing visit. You can then mark that visit as finished using visit-end, which will archive that visit. The ongoing visit will be removed from the Current Visit tab.
Format: visit-end
6. Autocomplete
Autocomplete
As a community nurse, you will be performing several commands through the Command Line Interface (CLI). In order to speed up the process, the application includes an autocomplete feature that allows you to more quickly and conveniently input your commands and parameters. This section describes the feature in further detail.
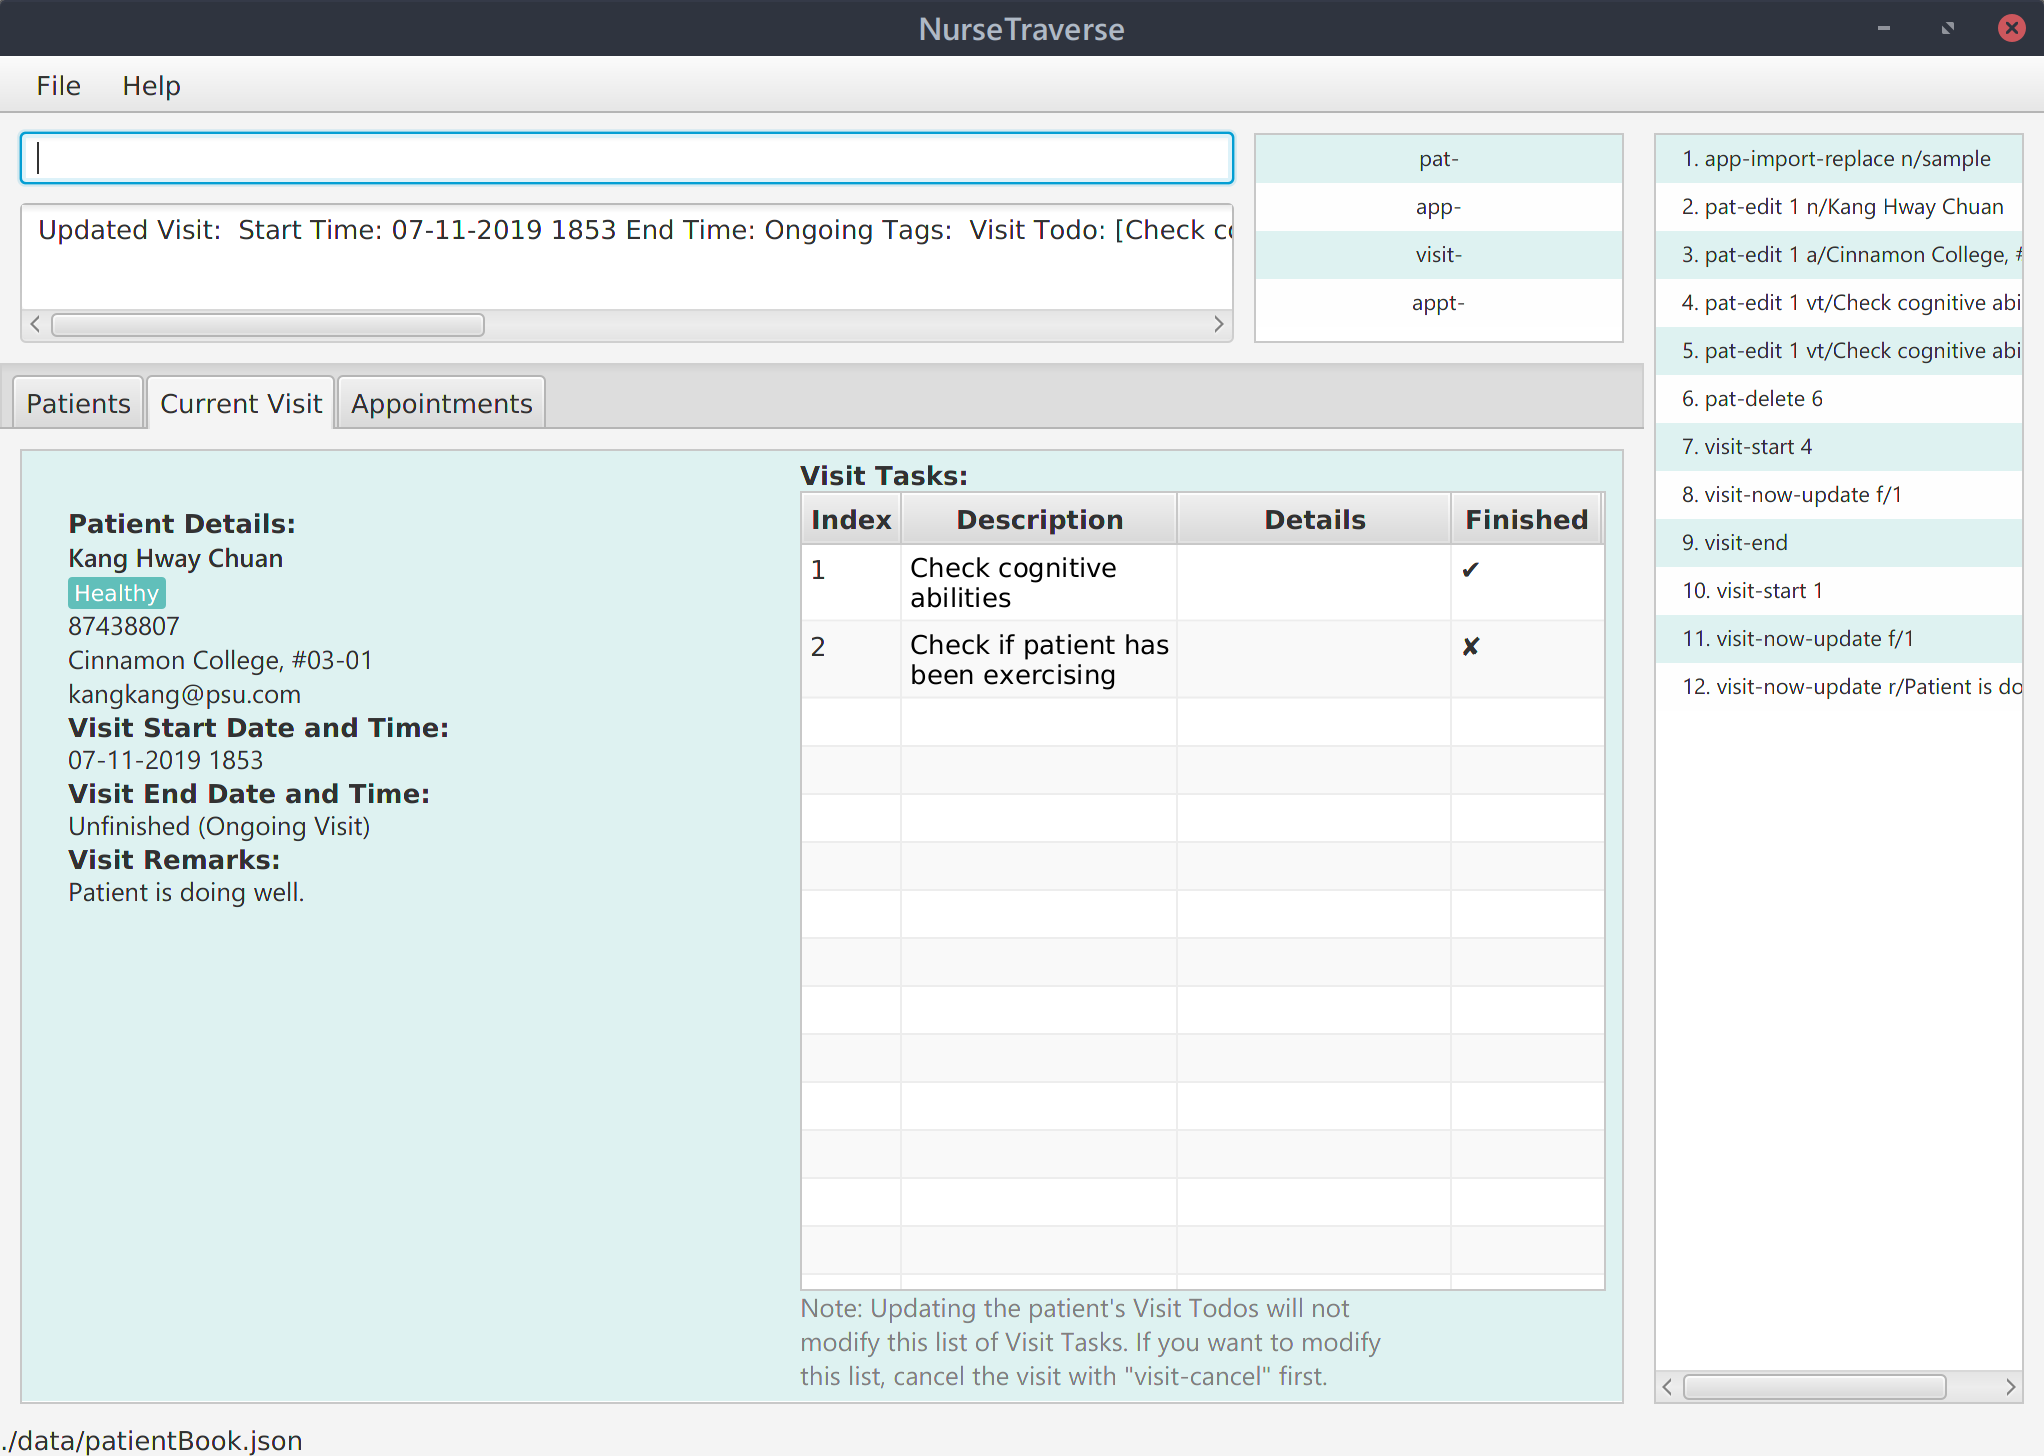
6.1. Viewing list of suggested words
To the right of the command box, there is a panel that has a list of suggestion words. The suggestion list will be constantly updated to fit your input.
6.2. Updating list of suggested words
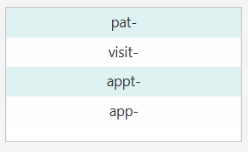
The suggested list of words in the autocomplete panel will be updated as you type in the command box. The panel will only suggest to you words that you need, based on your input and your previous word selection. Should your input be wrong or does not match any of the suggested word, no words will be suggested to you.
Eg:
If "visit-" is your input in the commandbox, only words that are related to "visit" will be suggested such as "start" and "end".
Figure 1: Example usage 1

If "visit-s" is your input in the commandbox, only words that starts with "s" and is also related to visit such as "start" will be suggested.
Figure 1: Example usage 2

Note:
-
When prefixes are suggested, you should select all prefixes that you need then type in the required sub-details
Eg: Select all prefixes "pat-add n/ p/ e/ a/ t/" before adding sub-details "pat-add n/John p/98762615 e/john@example.com a/exampleaddress t/exampletag vt/examplevisittodo" -
If no words appear in the autocomplete panel, this can only mean 2 things:
1) Your full command is finished, there are no more words to be suggested.
2) Your input is wrong and does not match any of the words to be suggested. (Try to change your input by backspacing)
6.3. Selecting a suggested words
UP, DOWN key
You can use the UP and DOWN keys in your keyboard to move from one selected word to another. Descriptions of the suggested words will be shown as you select them to guide you in choosing.
SHIFT key
Confirm your selection by pressing the SHIFT key in your keyboard. This will auto-fill the selected word to your current words in the command box text field.
Eg:
Selecting the "now-update" in the autocomplete panel will concatenate with "now-update" with "visit-", the current text in your command box.
Note:
When pressing UP, DOWN, or SHIFT keys, make sure that the command box is selected.
7. Data Saving, History, Undo, Redo
Data Saving, History, Undo, Redo
As a community nurse, you will often perform commands that modify information managed by the application (e.g. patient data). This section describes the features involving the storage of this data, viewing command history, and undo-ing / redo-ing commands.
7.1. Saving your data
Your data are saved in the hard disk automatically after any command that changes the data.
There is no need to save manually.
7.2. Viewing the command history
The rightmost panel of the app shows a history of the previous data-modifying commands executed
since the app was started. Examples of data-modifying commands are pat-edit or visit-start.
Commands that do not affect the app data, such as pat-list, are not shown.
Each command is displayed with an index number. The most recent command is shown at the bottom of the history and has the greatest index number. The earliest command in the history is shown at the top with an index of 1.
The app keeps a record of the previous 20 data-modifying commands in the history.
7.3. Undoing a command: app-undo
You can undo the changes of the data-modifying commands in the history
with app-undo. All app data will be reverted to how they were before the
undone command was executed.
app-undo can be used in two ways. The first way is to provide no arguments
to the command. This simply undoes the latest command. The second way is to
specify the index of a command in the history. This would cause all commands
after and including that command to be undone.
The command app-undo itself is not affected by app-undo and is not recorded in
the history. To revert an app-undo, use app-redo.
Format: app-undo [INDEX]
Examples:
-
pat-clear
pat-list
app-undo(reverts thepat-clearcommand) -
Suppose the history looks like this:
-
pat-edit 1 n/Ivan Yeoh -
pat-delete 3 -
pat-clear
Now
app-undo 2is executed.pat-clearandpat-delete 3are undone in that order. The app data is now as it was beforepat-delete 3was executed. -
7.4. Redoing an undone command: app-redo
You can redo and reapply the changes of the last undone command using app-redo.
This is only possible when the latest data-modifying command (other than
app-redo itself) was an app-undo.
Format: app-redo
Examples:
-
pat-edit 1 n/Ivan Yeoh
app-undo
app-redo(reverts data to afterpat-editwas executed) -
pat-edit 1 n/Ivan Yeoh
pat-clear
app-undo
app-undo
app-redo(redoespat-edit)
app-redo(redoespat-clear) -
Suppose the history looks like this:
-
pat-edit 1 n/Ivan Yeoh -
pat-delete 3 -
pat-clear
Now the following commands are executed:
app-undo 2(revertspat-clearandpat-delete)
app-redo(redoespat-delete)
app-redo(redoespat-clear) -
8. Importing and Exporting of Patient Data
Importing and Exporting of Patient Data
As a community nurse, you may be assigned new patients, or some of your patients may be assigned to other community nurses. To facilitate the transferring of patient information from one device to another, you can import and export the data of your patients. This section describes the features that will allow you to import and export patient information.
|
CSV Compatibility You may encounter issues when trying to import a CSV file written by another machine with a different operating system. As of v1.4, CSV files written by Windows and Unix machines are not cross-compatible. This means that the app, running on Windows, can only import CSV files written by a Windows machine. The same goes for Unix systems. This issue can be circumvented by using text file format converters to convert a Windows written CSV to a Unix one, and vice versa.
The recommended converters are |
8.1. Importing Patients from a CSV file: app-import-replace, app-import-merge
You can import patient data from a .csv file into the application using
app-import-replace or app-import-merge.
|
CSV files used for importing must adhere to the following format requirements.
|
Examples of valid CSV files can be seen here
8.1.1. Import and Replace: app-import-replace
Reads patient data from a specified .csv file.
".csv" will be auto-appended to the specified FILENAME,
so there is no need to type in the file extension.
|
All existing patient data will be deleted and replaced with this new data. All existing appointment data will be deleted. |
Format: app-import-replace n/FILENAME
Examples:
-
app-import-replace n/my_assigned_patients-
Patient data will be entirely replaced with new data from
./imports/my_assigned_patients.csv.
-
8.1.2. Import and Merge: app-import-merge
Patient data will be read from a specified .csv file and merged without affecting existing data.
".csv" will be auto-appended to the specified FILENAME,
so there is no need to type in the file extension.
Format: app-import-merge n/FILENAME
Examples:
-
app-import-replace n/my_new_patients-
Patient data from
./imports/my_new_patients.csvwill be added into the app.
-
8.2. Exporting patients into a CSV file: app-export
You can export patient data from the application into a .csv file using app-export.
A new .csv file will be created and data will be written into it.
Indexes can be provided to selectively export data of specific persons.
".csv" will be auto-appended to the specified FILENAME,
so there is no need to type in the file extension.
Format: app-export n/FILENAME [i/INDEX…]
Examples:
-
app-export n/patients-
All patient data will be exported to
./exports/patients.csv.
-
-
app-export n/alex i/1-
The data of the patient at index 1 will be exported to
./exports/alex.csv.
-
-
app-export n/tomorrow i/2 i/4 i/6-
The data of the patients at indexes 2, 4 and 6 will be exported to
./exports/tomorrow.csv.
-
|
8.3. Exporting Appointments [coming in v2.0]
You can export your appointment data into a .csv file using app-export-appt.
A new .csv file will be created and data will be written into it.
Format: app-export-appt n/FILENAME
Examples:
-
app-export-appt n/appointments-
All appointment data will be exported to
./exports/appointments.csv.
-
Tutorials / How-To Guide(s) (as of v1.4)
1. Visit Tutorials / How-To Guide(s)
1.1. What are Visit Todos (and Visit Tasks)?
Visit Todos are, as the name suggests, todo items. These are items that are attached to a patient and are todo items that you want to be reminded to do when you visit that patient. Each Visit Todo contains a description of that task.
When you begin a visit using visit-start, the patient’s Visit Todos are copied into the visit checklist as Visit Tasks. Each visit task has a description (of the visit todo it was copied from) which is a field for you to add details to that task, and a flag to indicate if that task is finished.
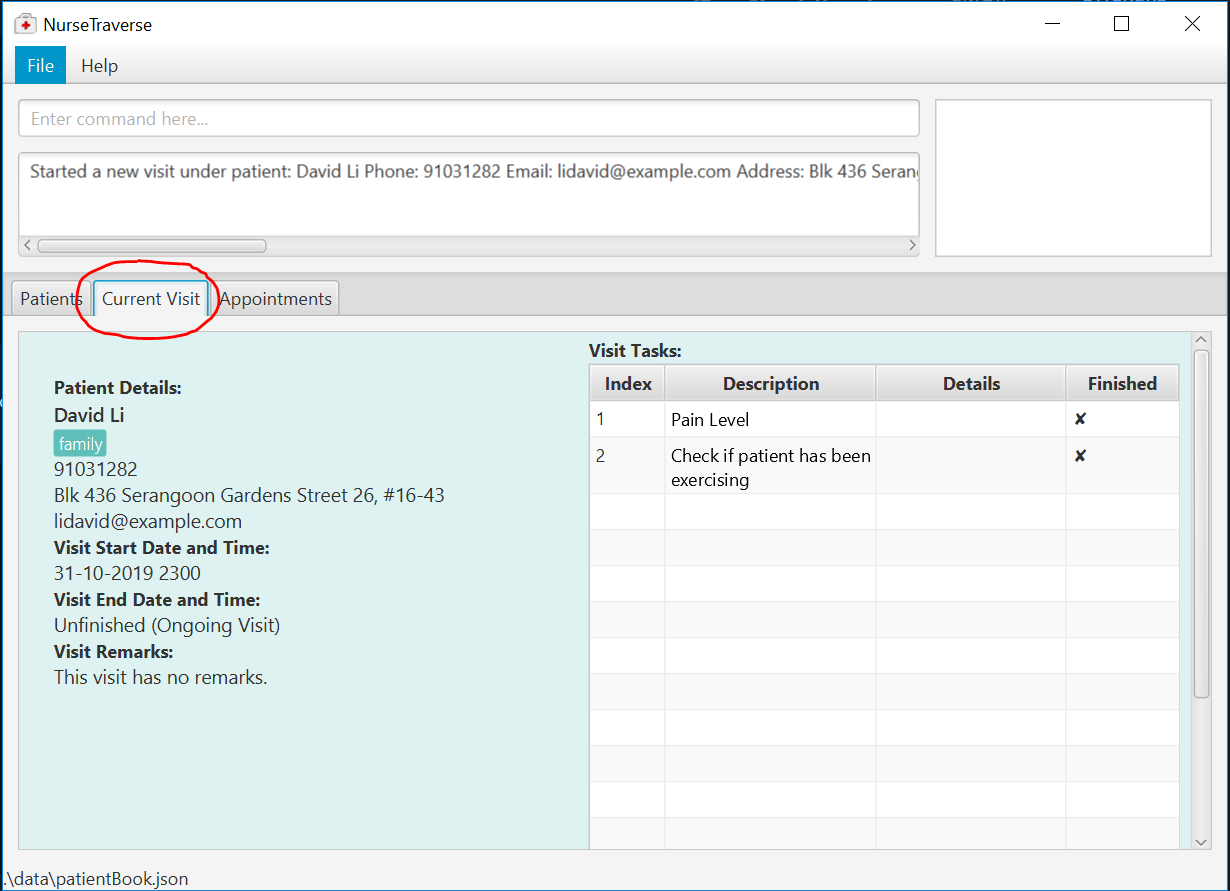
1.2. How to view the ongoing visit
The ongoing visit can be viewed by clicking on the current visit tab. Note that you will have to change tabs manually and your commands will not affect which tab you are viewing.
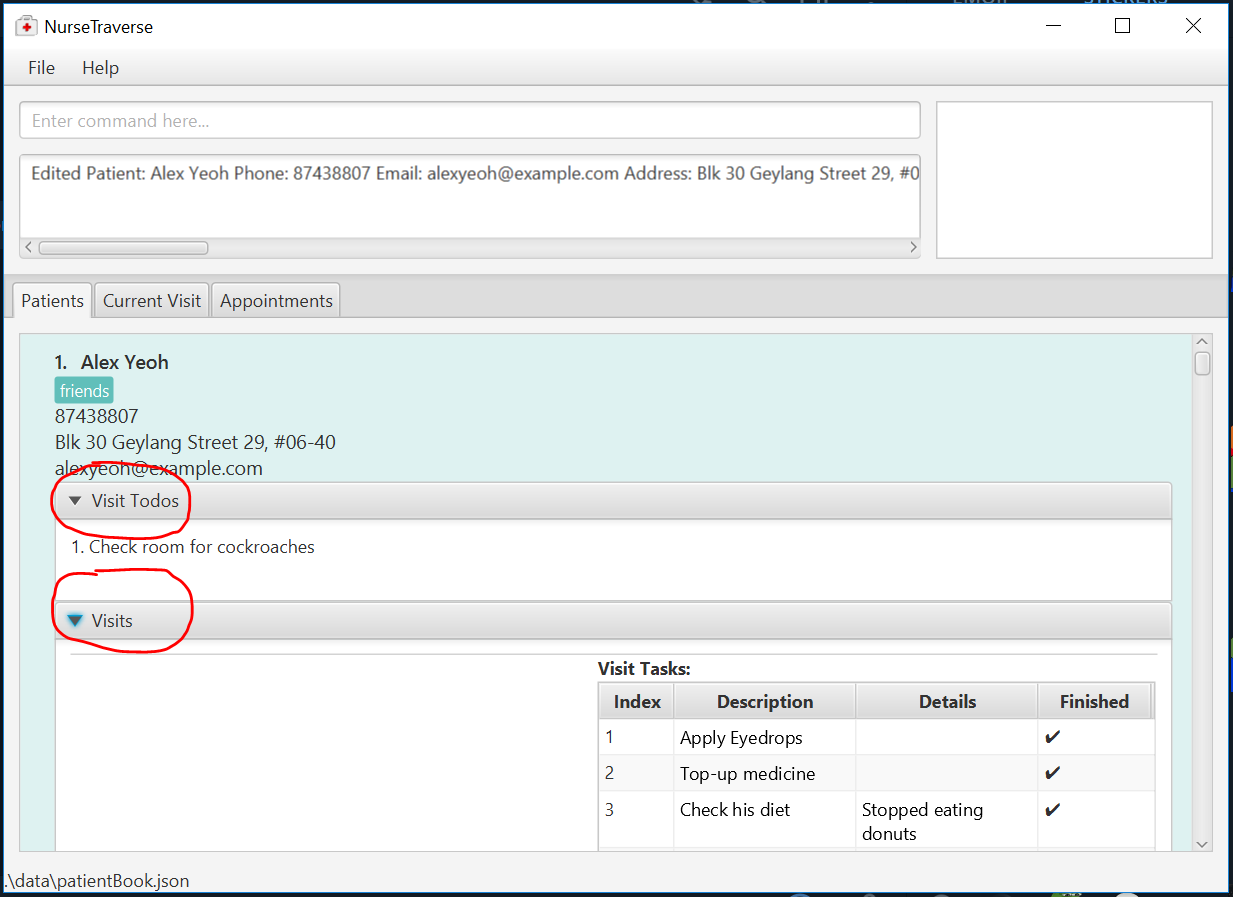
1.3. How to view the visit todos of a patient
You can view the visit todos of a patient using pat-list and pat-find. Visit Todos are displayed under their patient details. A visual representation can be seen below.
1.4. How to view visits of a patient (previous and ongoing)
You can view the visits of a patient using pat-list and pat-find. Visits are displayed under their patient details.
1.5. How to manage a visit (an example)
To introduce how to manage a visit, let’s use an example where you have a patient named John Heng. Assume that John is a new patient (his data is not in NurseTraverse) and you have the following list of things (visit todos) you want to do when you visit him:
-
Take Blood Pressure
-
Take Body Temperature
-
Restock Medicine
Adding a new patient with Visit Todos
If you are adding a new patient, you can add these visit todos using pat-add. Example: pat-add n/John Heng p/82221222 e/john@gmail.com a/John’s address t/Male vt/Take Blood Pressure vt/Take Body Temperature vt/Restock Medicine.
Editing the Visit Todos of a patient
Alternatively, if John is an existing patient in NurseTraverse you can update John’s list of Visit Todos using pat-edit. Let’s assume that John is the 2nd patient in pat-list, so you would use pat-edit 2 vt/Take Body Temperature vt/Restock Medicine.
Starting a Visit
Let’s assume that you decide to visit John’s house. When you are at John’s house during a house visit and you want to begin keeping track of your visit and recording visit details, you can use visit-start. In this scenario, John is the 2nd patient in pat-list, so you would use visit-start 2. Since you can only be visiting one patient at one time, you can only have one ongoing visit at any time; visit-start can only be performed if there is no ongoing visit.
Cancelling a Visit
If you realized you started the visit for a wrong person, you can cancel it using visit-cancel.
Updating a Visit’s details
Once you have begun a visit using visit-start, you can begin updating the visit’s details using visit-now-update. Let’s assume that you’ve finished all the tasks in the checklist during your visit with John, so an example would be visit-now-update f/1 f/2 f/3.
If you accidentally marked a task as finished, you can mark it as unfinished using uf/TASK_INDEX e.g. visit-now-update uf/1.
If you also want to add details to the tasks (e.g. record the blood pressure as task 1, body temperature as task 2) you can do so like this: visit-now-update d/1 140/90mmHg d/2 37.0.
You can also set the visit’s remarks. An example would be visit-now-update r/Remember to bring stretch band next session.
Finally, you can combine all of the above into one command: visit-now-update f/1 f/2 f/3 d/1 140/90mmHg d/2 37.0 r/Remember to bring stretch band next session.
Finishing a Visit
Finally, once you have concluded the visit, you can finish the visit using visit-end. This will tell the application that the ongoing visit has concluded. It will then save the visit under the patient (in this case, John).
Viewing previous Visits
You can view the visits of a patient using pat-list and pat-find. Visits are displayed under their patient details. In this case, it may be better to use pat-find to find John’s records e.g. pat-find John Heng.
Planned Feature(s) (coming in v2.0)
1. Login System & Security [coming in v2.0]
Login System & Security
As a community nurse, you will often be managing your patients' confidential data. A login system will be useful in helping you to ensure the confidentiality and security of your patients' information. This section describes the features that will allow you to manage this security system.
1.1. Enabling the Login System login-enable [coming in v2.0]
If you haven’t setup a login PIN, you can enable the login system by setting a login pin using login-enable.
Format: login-enable PIN
1.2. Disabling the Login System login-disable [coming in v2.0]
If you have setup a login PIN, you can disable the login system using login-disable.
Format: login-disable CURRENT_PIN
1.3. Changing the Login Pin login-changepin [coming in v2.0]
If you have setup a login PIN, you can change the pin using login-changepin.
Format: login-changepin o/OLD_PIN n/NEW_PIN
1.4. Locking the Application login-lock [coming in v2.0]
If you have setup a login PIN, you can lock the application using login-lock.
Format: login-lock
1.5. Changing Login Lock Timeout login-timeout [coming in v2.0]
If you have setup a login PIN, you can change the amount of time (in minutes) before the system automatically locks the application using login-timeout.
Format: login-timeout MINUTES
Example: login-timeout 3 will configure the system to automatically lock the application after 3 minutes.
1.6. Logging in / Unlocking the Application [coming in v2.0]
On the lock screen you will be prompted to enter your PIN. Once you enter the correct and press Enter, the application will unlock.
1.7. Data Encryption [coming in v2.0]
The save files of the application will be automatically encrypted using your PIN.
FAQ
Q: How do I transfer my data to another Computer?
A: Install the app in the other computer and overwrite the empty data file it creates with the file that contains the data of your previous NurseTraverse folder.
Alternatively, you can use the import and export functions to transfer patient data. Refer to Section 8, “Importing and Exporting of Patient Data”.