By: Team AY1920S1-CS2103-F10-1 Since: Jun 2019 Licence: MIT
- 1. Setting up
- 2. Design
- 3. Implementation
- 4. Documentation
- 5. Testing
- 6. Dev Ops
- Appendix A: Product Scope
- Appendix B: User Stories
- Appendix C: Use Cases
- Appendix D: Non Functional Requirements
- Appendix E: Glossary
- Appendix F: Instructions for Manual Testing
- F.1. Launch and Shutdown
- F.2. Deleting a patient
- F.3. Updating a patient’s Visit Todos
- F.4. Starting a Visit for a patient
- F.5. Updating an ongoing visit
- F.6. Cancelling a Visit for a patient
- F.7. Finishing a Visit for a patient
- F.8. Adding an appointment
- F.9. Editing an appointment
- F.10. Deleting a non-recurring appointment
- F.11. Deleting a recurring appointment
- F.12. Deleting an appointment permanently
- F.13. Changing of autocomplete suggestion list
- F.14. Updating of current autocomplete suggestion list
- F.15. Exporting data
- F.16. Importing data
- F.17. Viewing the command history:
- F.18. Undoing a command:
- F.19. Redoing a command:
1. Setting up
Refer to the guide here.
2. Design
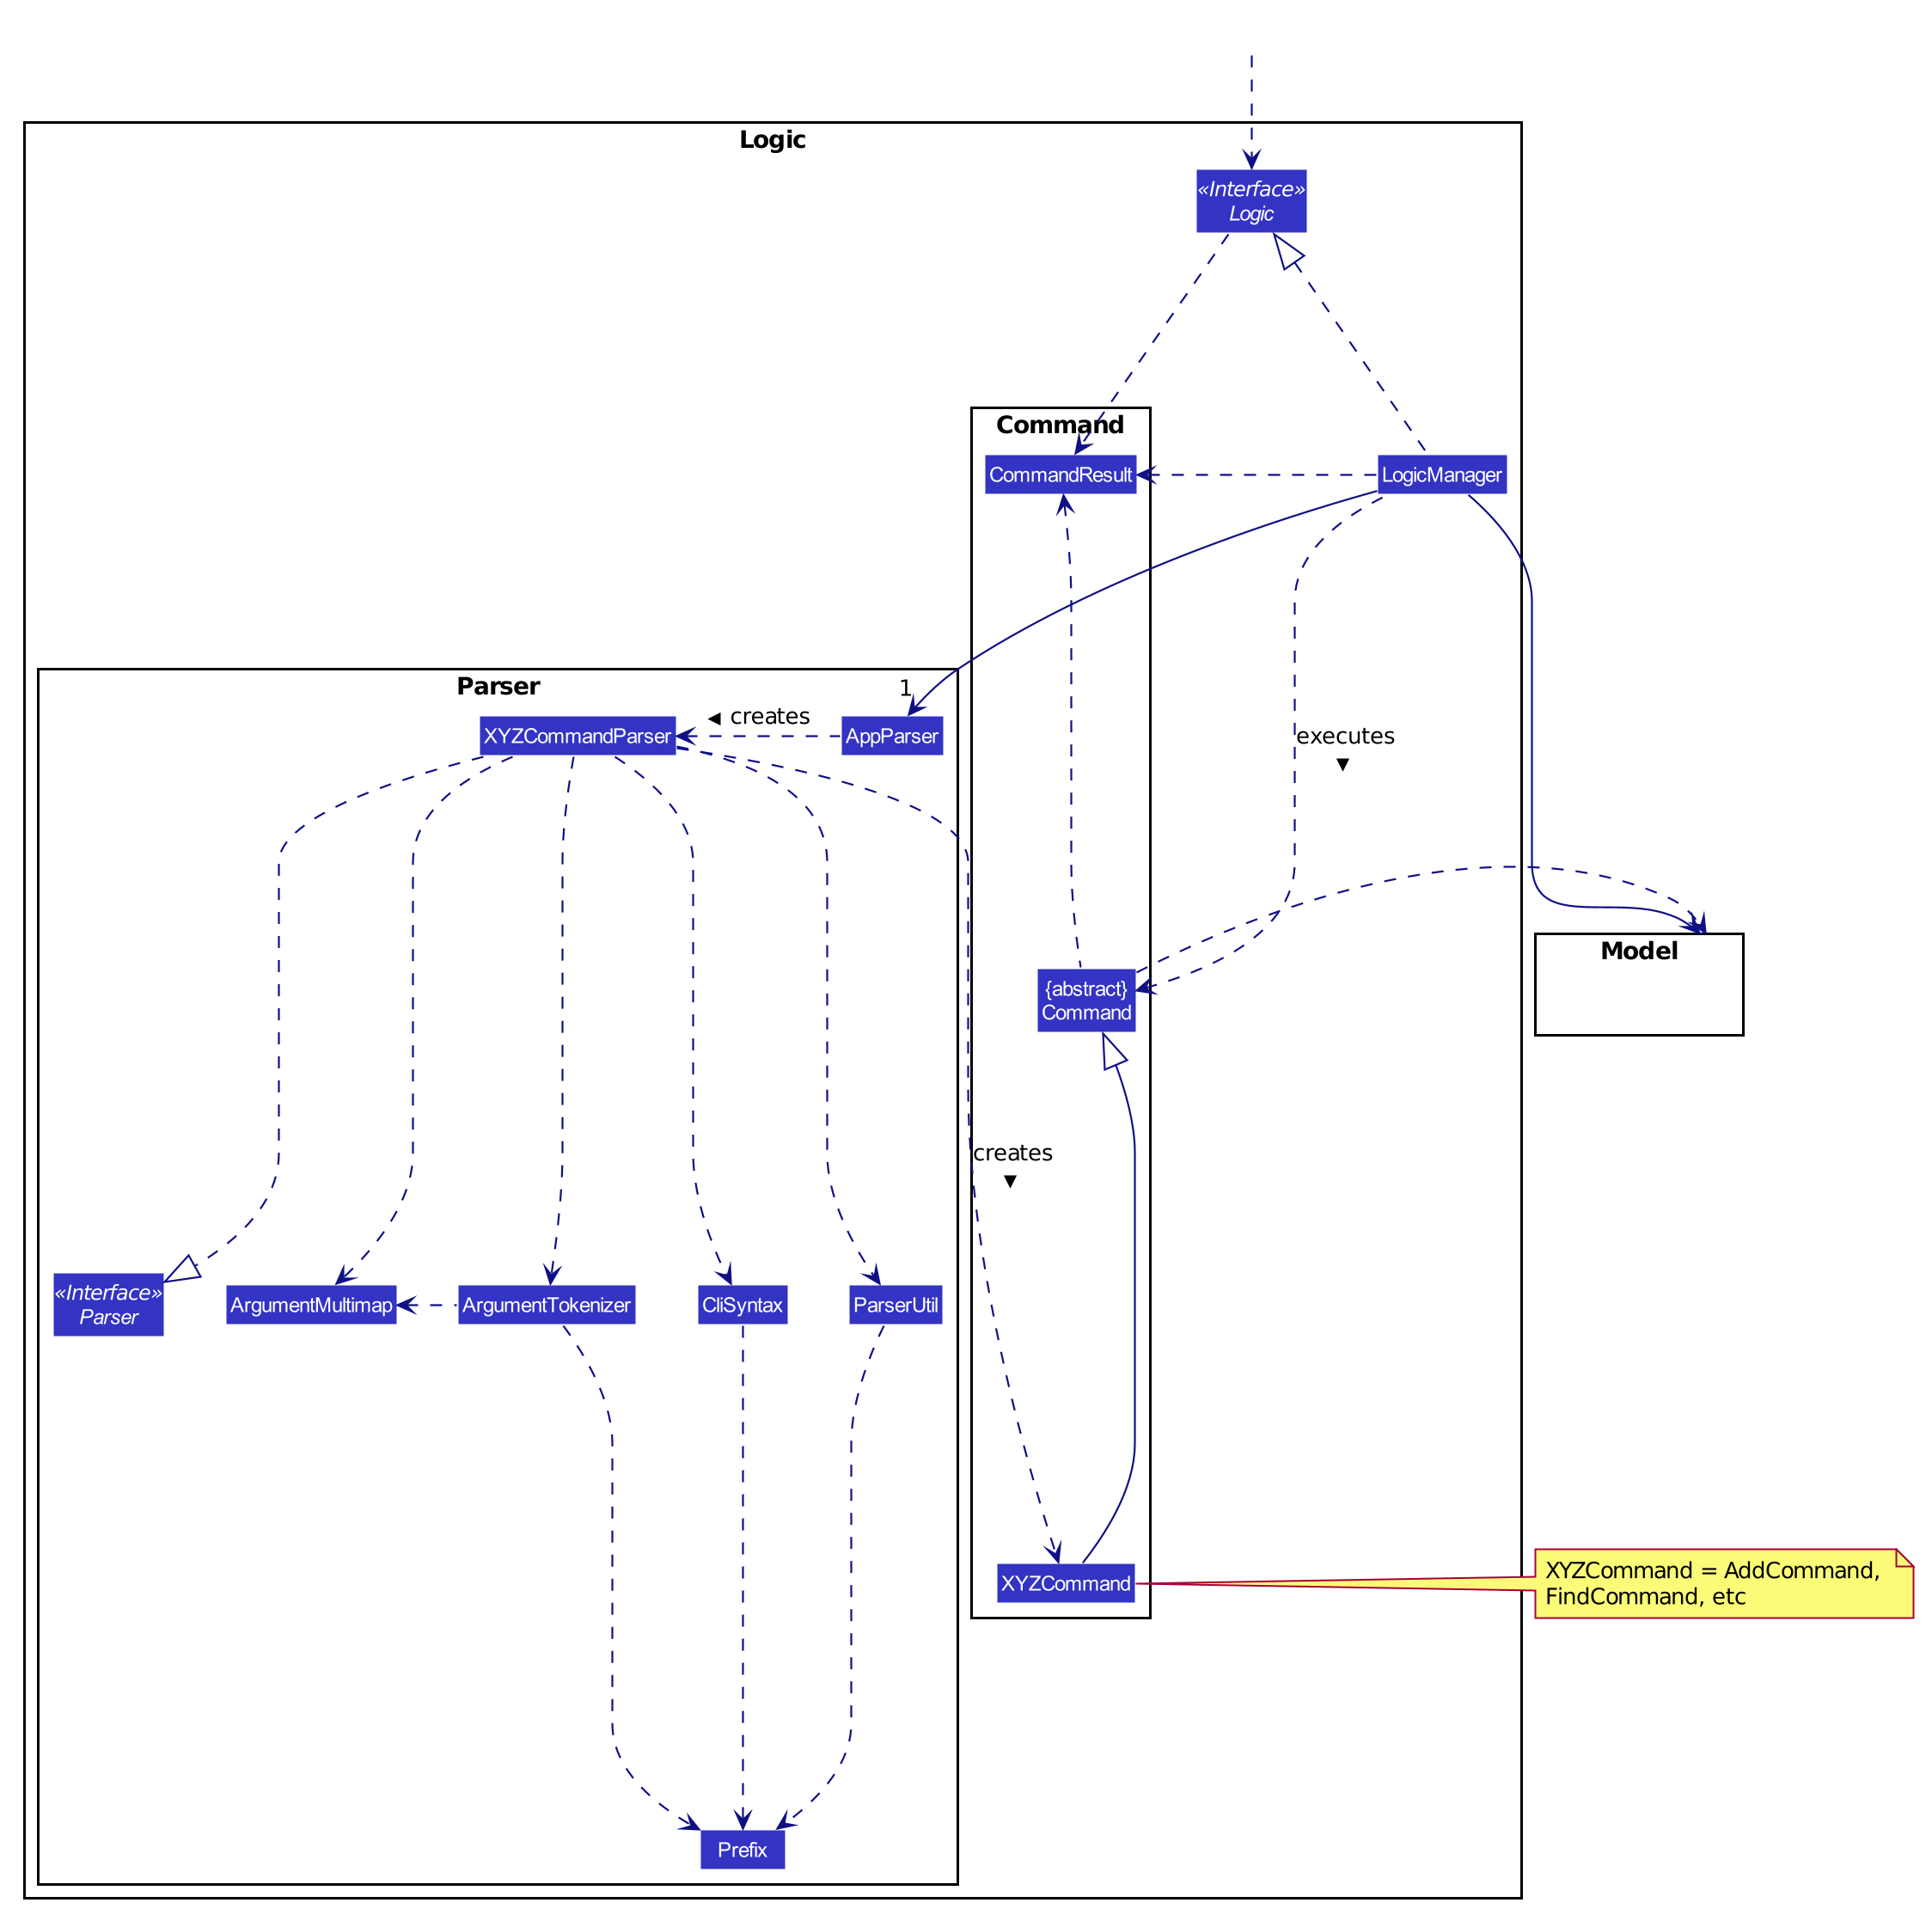
2.1. Architecture

The Architecture Diagram given above explains the high-level design of the App. Given below is a quick overview of each component.
-
At app launch: Initializes the components in the correct sequence, and connects them up with each other.
-
At shut down: Shuts down the components and invokes cleanup method where necessary.
Commons represents a collection of classes used by multiple other components.
The following class plays an important role at the architecture level:
-
LogsCenter: Used by many classes to write log messages to the App’s log file.
The rest of the App consists of four components.
Each of the four components
-
Defines its API in an
interfacewith the same name as the Component. -
Exposes its functionality using a
{Component Name}Managerclass.
For example, the Logic component (see the class diagram given below) defines it’s API in the Logic.java interface and exposes its functionality using the LogicManager.java class.
How the architecture components interact with each other
The Sequence Diagram below shows how the components interact with each other for the scenario where the user issues the command pat-delete 1.
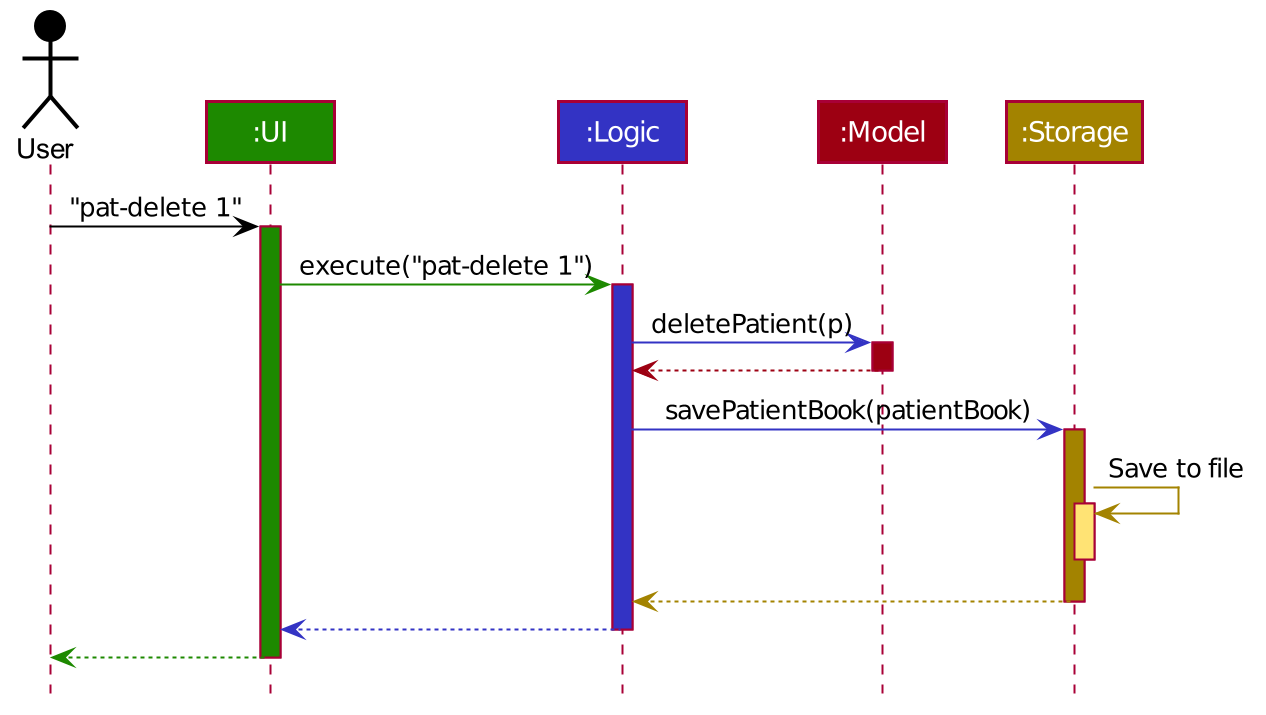
pat-delete 1 commandThe sections below give more details of each component.
2.2. UI component
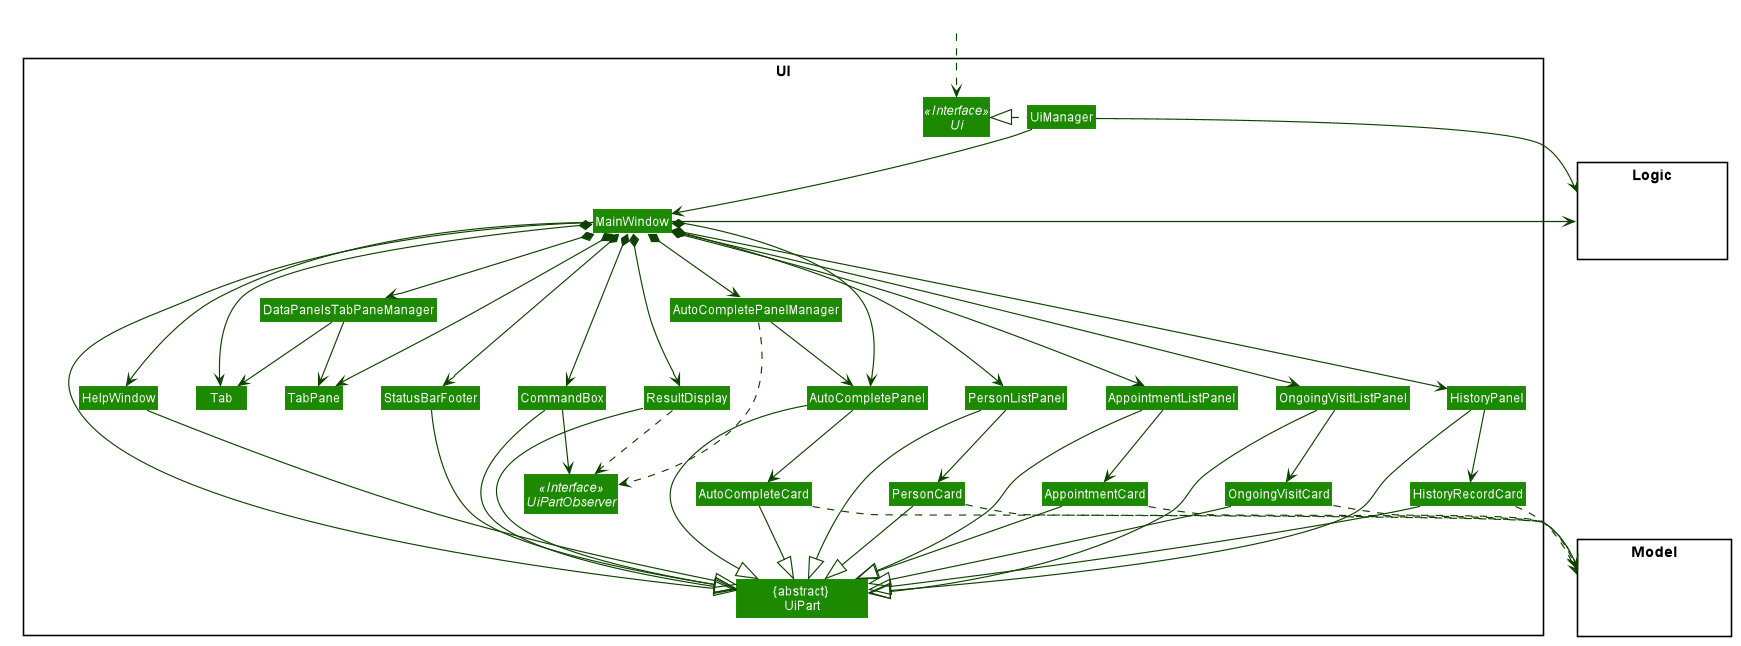
API : Ui.java
The UI consists of a MainWindow that is made up of parts e.g.CommandBox, ResultDisplay, PersonListPanel, StatusBarFooter etc. All these, including the MainWindow, inherit from the abstract UiPart class.
The UI component uses JavaFx UI framework. The layout of these UI parts are defined in matching .fxml files that are in the src/main/resources/view folder. For example, the layout of the MainWindow is specified in MainWindow.fxml
The UI component,
-
Executes user commands using the
Logiccomponent. -
Listens for changes to
Modeldata so that the UI can be updated with the modified data.
Manager classes like AutoCompletePanelManager and DataPanelsTabPaneManager handles changes of its respective components.
UiPartObserver interface prevents direct communication between 2 UiPart. It is implemented by the result display and autocomplete panel to listen for userinput from the command box and make changes acccordingly.
2.3. Logic component
API :
Logic.java
-
Logicuses thePatientBookParserclass to parse the user command. -
This results in a
Commandobject which is executed by theLogicManager. -
The command execution can affect the
Model(e.g. adding a person). -
The result of the command execution is encapsulated as a
CommandResultobject which is passed back to theUi. -
In addition, the
CommandResultobject can also instruct theUito perform certain actions, such as displaying help to the user.
Given below is the Sequence Diagram for interactions within the Logic component for the execute("delete 1") API call.
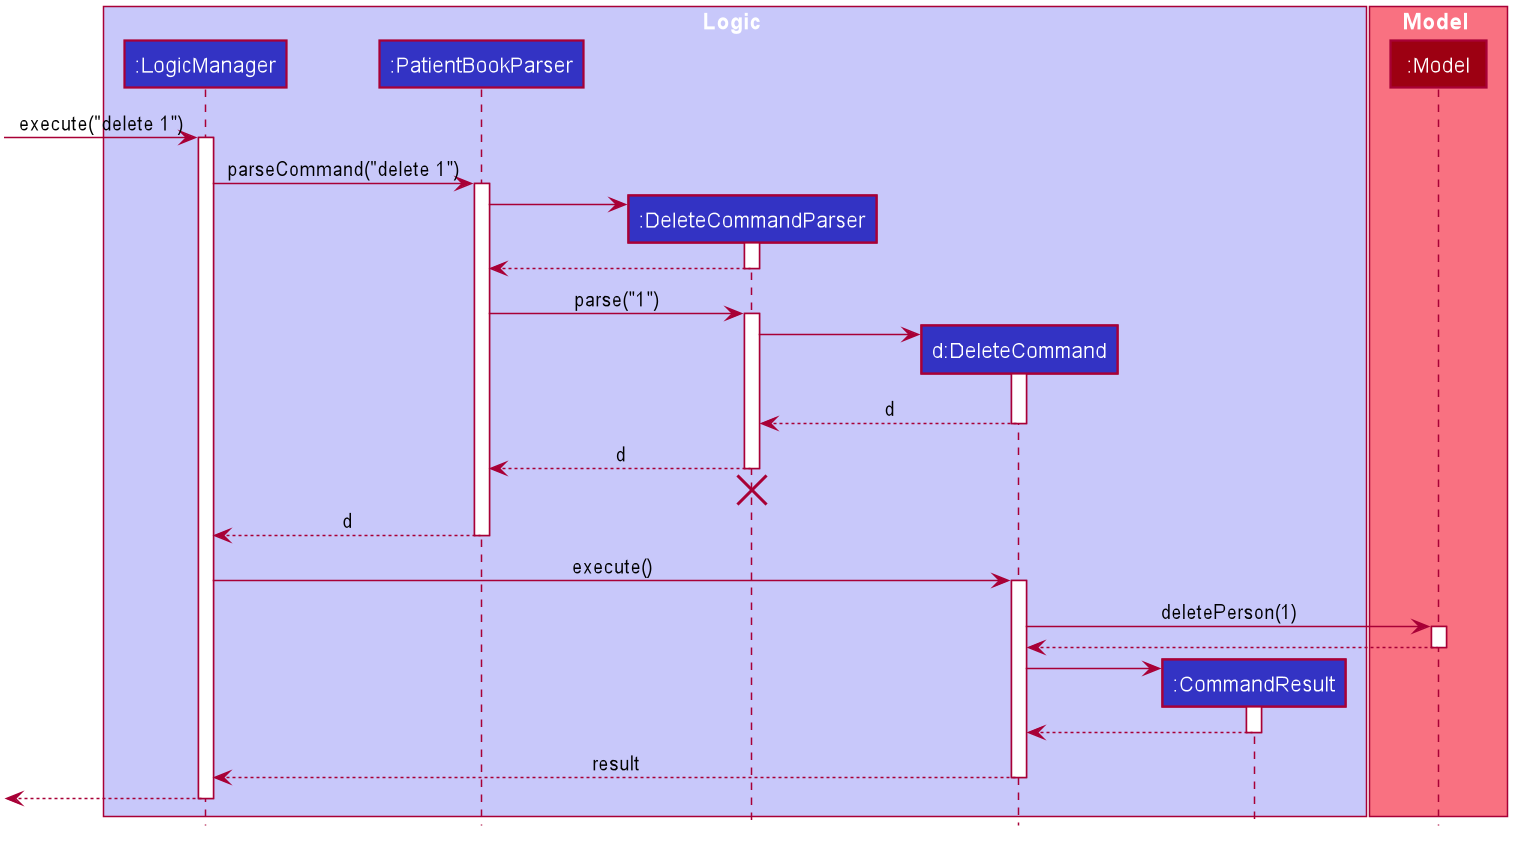
delete 1 Command
The lifeline for DeleteCommandParser should end at the destroy marker (X) but due to a limitation of PlantUML, the lifeline reaches the end of diagram.
|
2.4. Model component
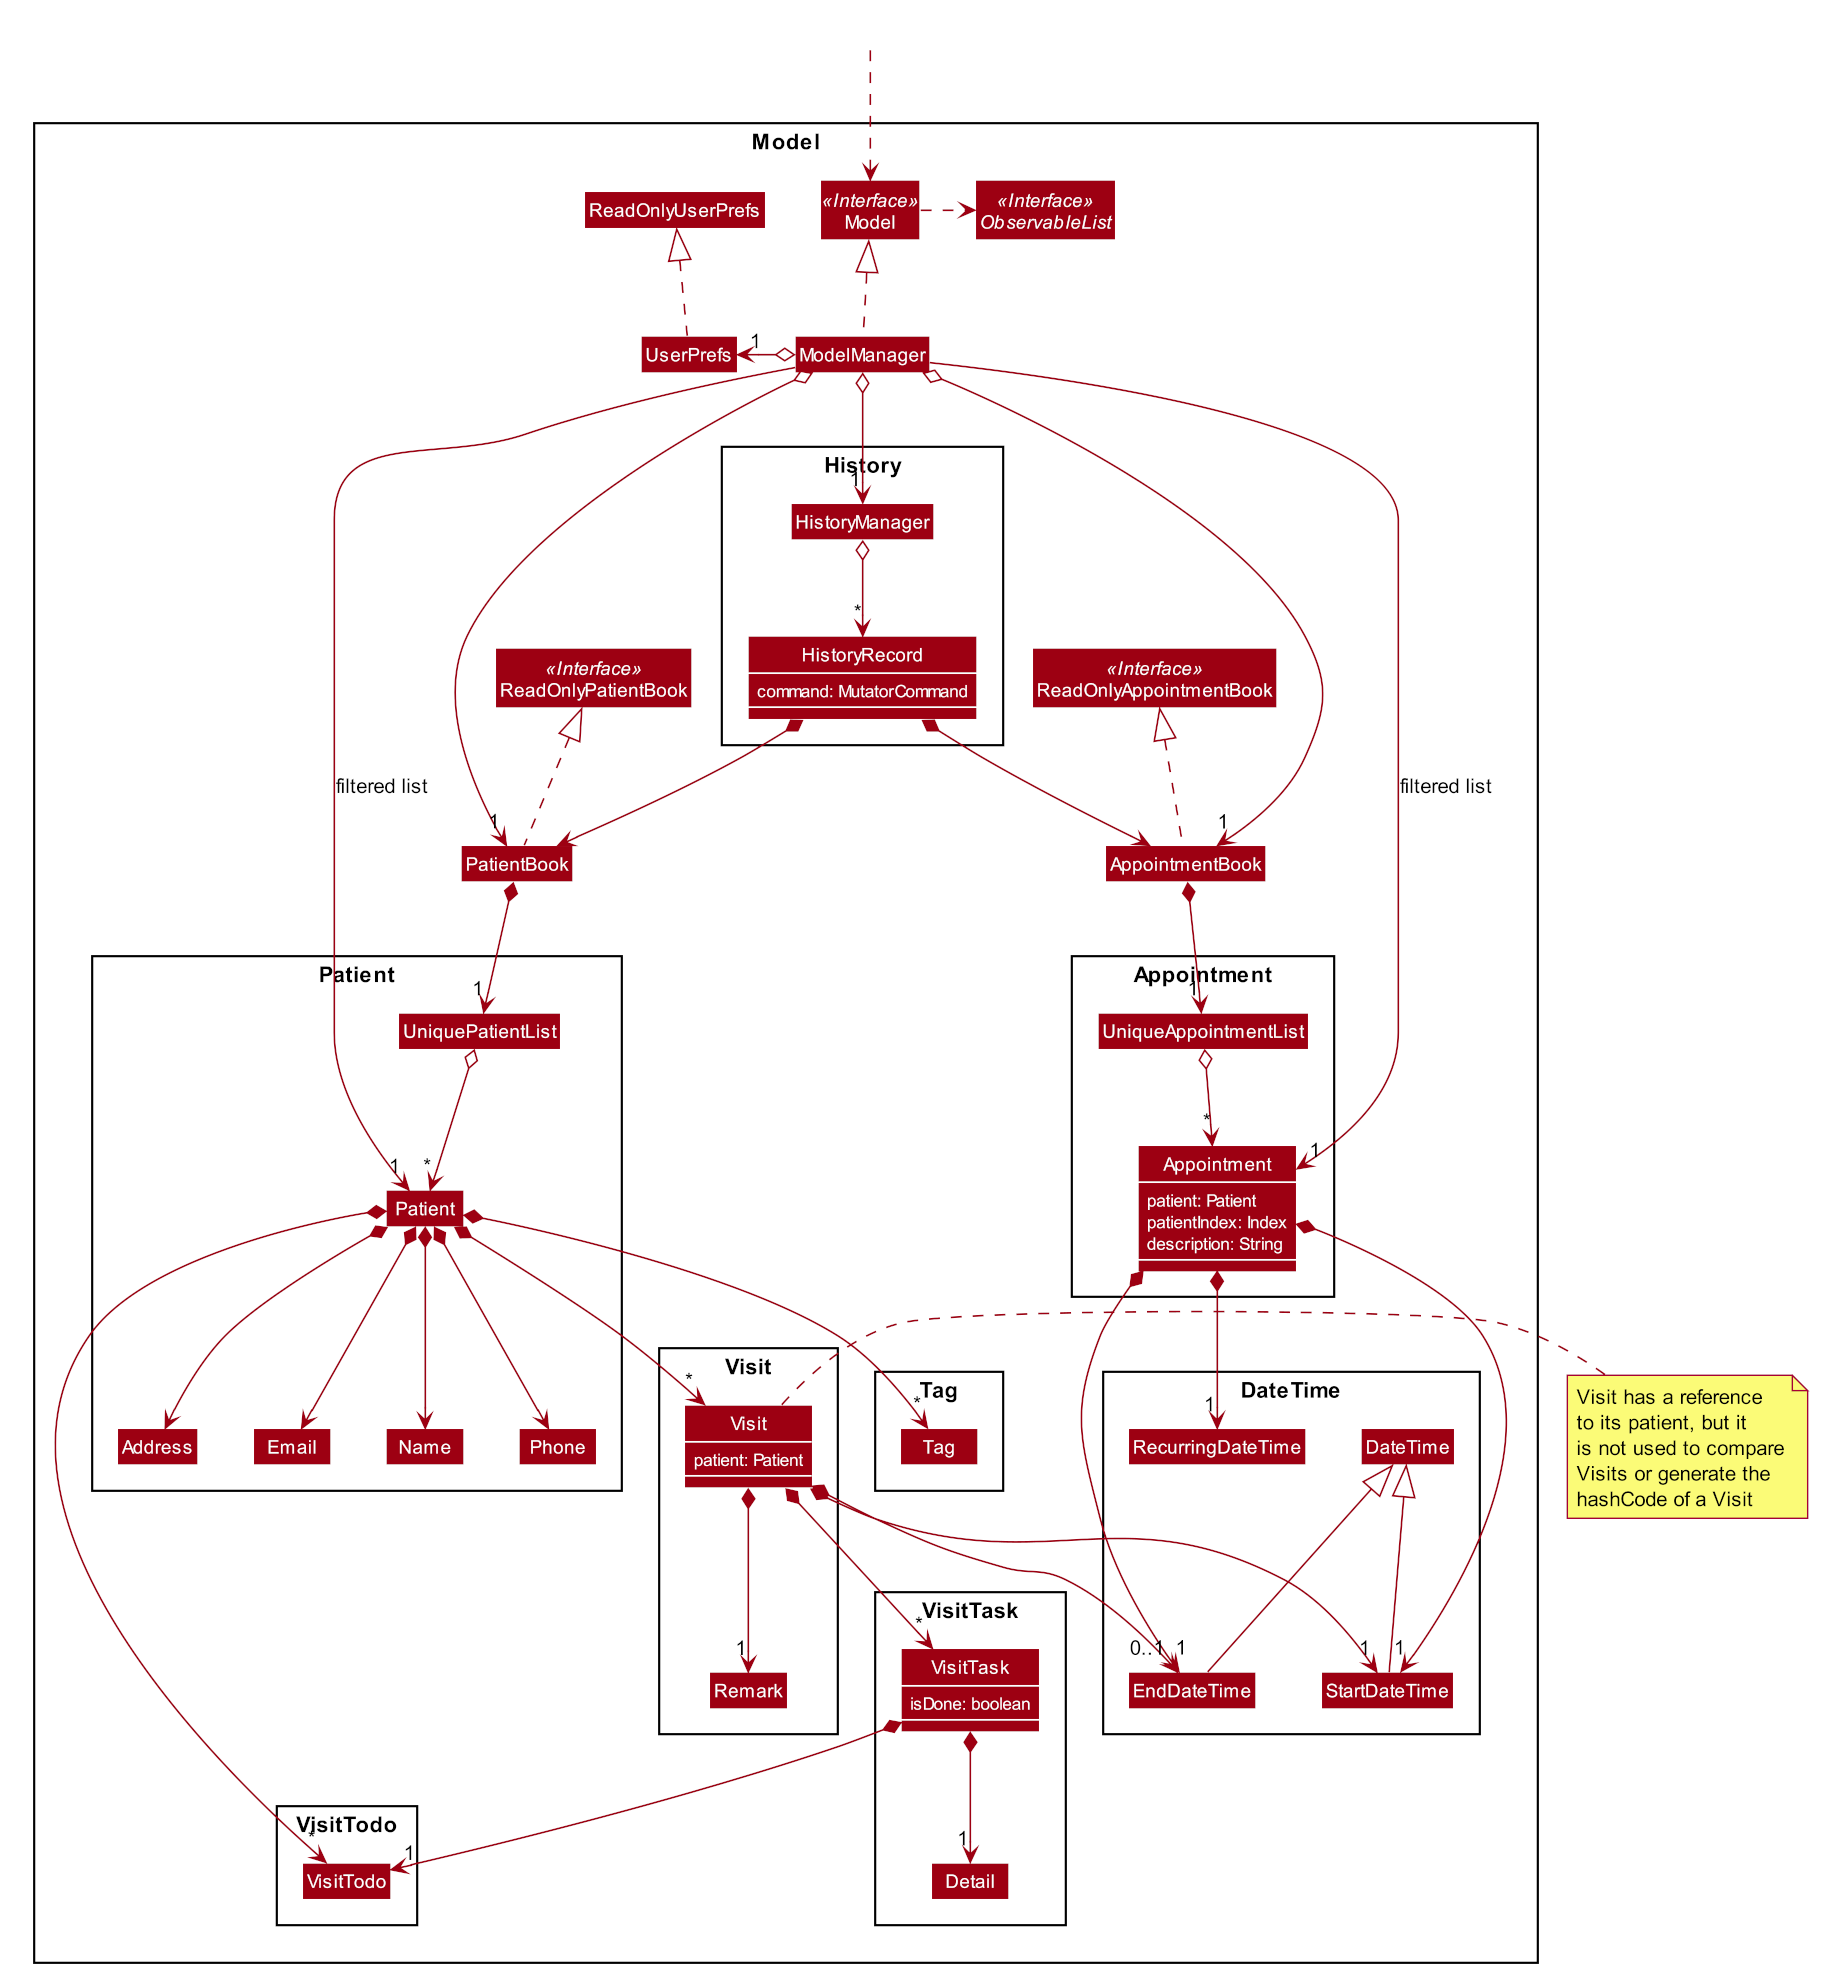
API : Model.java
The Model,
-
stores a
UserPrefobject that represents the user’s preferences. -
stores the
PatientBook,AppointmentBook, andHistoryManagerdata. -
exposes unmodifiable
ObservableList<Patient>,ObservableList<Appointment>, andObservableList<HistoryRecord>that can be 'observed' i.e. the UI can be bound to these lists so that the UI automatically updates when the data in the lists change. -
does not depend on any of the other three components.
2.5. Storage component
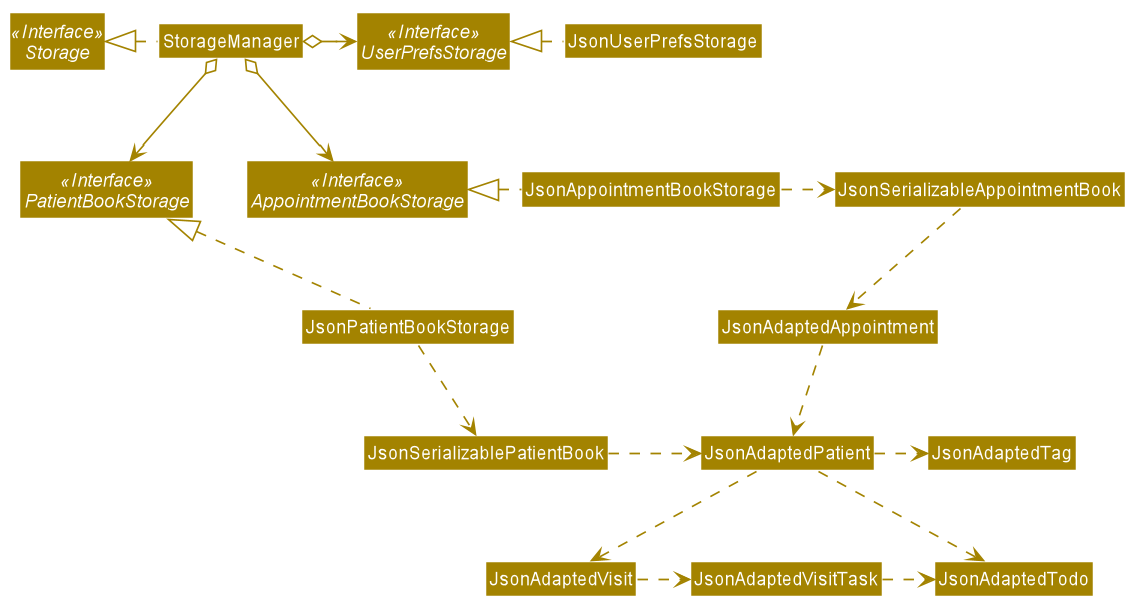
API : Storage.java
The Storage component,
-
can save
UserPrefobjects in json format and read it back. -
can save the Patient Book data in json format and read it back.
-
can save the Appointment Book data in json format and read it back.
2.6. Common classes
Classes used by multiple components are in the cs.f10.t1.nursetraverse.commons package.
3. Implementation
This section describes some noteworthy details on how certain features are implemented.
3.1. Undo/Redo/History
This set of functionality consists of one GUI component and two commands, each of which rely on the same core components:
-
HistoryPane- GUI component that displays a numbered list of previous data-modifying commands that can be reverted byapp-undo. -
app-undo- Command that reverts until a specified data-modifying command in the history, or the previous data-modifying command if no argument is specified. -
app-redo- Command that reverts the previous command if and only if it was anapp-undo.
3.1.1. Overview of Changes
For undo/redo/history to function, there must be the following:
-
A way to mark which
Commands are data-modifying commands so that non-data-modifying commands can be ignored. -
A mechanism to clearly demarcate the model state before and after the execution of each data-modifying command.
-
A way to record the state of the model before (or after) each command, together with the
Commandobject responsible. -
Methods to switch the state of the model back and forth from the states stored in the history.
To achieve this, the following classes are introduced:
-
MutatorCommand- An empty subclass ofCommandto indicate that aCommandis a data-modifying command and should be considered for undo/redo/history. -
HistoryRecord- Record of the command and data of one atomic commit in the command history. It consists of theMutatorCommandresponsible for the commit and the state of the model either before or after the commit. All recorded states are deep copies decoupled from their original references. -
HistoryManager- Represents the history of the application. Maintains data structures containingHistoryRecords of each data state change.
Additionally, LogicManager and Model are modified to accommodate this functionality.
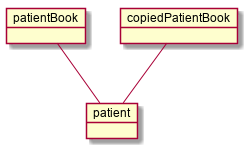
-
Performing a shallow copy of an object simply copies the values of the references of each object the original object is pointing to. This results in the copied object pointing to the same objects as the original. In the figure below,
patientBookandcopiedPatientBookare separatePatientBookobjects but actually share the samepatientobject. Changes topatientthroughPatientBookwould thus affectcopiedPatientBookas well.
-
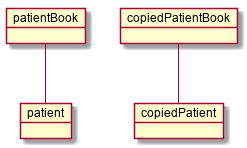
Performing a deep copy creates duplicates of each object referenced by the original, the objects referenced by those duplicates, and so on. These duplicates are completely decoupled from their originals. In the figure below,
patientis a different object fromcopiedPatient, thus changes topatientwould not affectcopiedPatient.
The following methods are added to the ModelManager class:
-
Model#commit(MutatorCommand)- Commits the changes made to the address book since the last call to this method, making them permanent and updating the UI data. Creates a newHistoryRecordcontaining the committingMutatorCommandand thePatientBookandAppointmentBookstates before the execution of the command and pushes it to theHistoryManagerfor storage. -
Model#getHistory()- Returns an unmodifiable view of the history. -
Model#undoTo(HistoryRecord)- Reverts current model state to the that contained in the specifiedHistoryRecord(i.e. the state before the command was executed). -
Model#redo()- Redoes the previousMutatorCommandif it was an undo by popping the latestHistoryRecordfrom theHistoryManager's redo stack.
Furthermore, in addition to MutatorCommand which was described earlier, the following logical classes are added:
-
UndoCommand- Undoes a designated command in the history, or the previous one if no argument is specified. TheCOMMAND_WORDfor this command isapp-undo. -
UndoCommandParser- Parses input arguments and creates a new UndoCommand object. -
RedoCommand- Redoes the previous command if it was an undo. TheCOMMAND_WORDfor this command isapp-redo.
HistoryManager checks the classes of commands pushed to the history and does not record
them if they are instances of UndoCommand or RedoCommand. This ensures that successive UndoCommand s do
not undo themselves instead of the desired data-modifying commands, requiring RedoCommand for
the special case of undo reversion.
3.1.2. Example Usage Scenario
The following example usage scenario and the state of historyManager at each step.
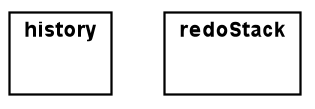
Step 1: The user launches the application.
HistoryManager is initialized with empty history and redoStack objects.
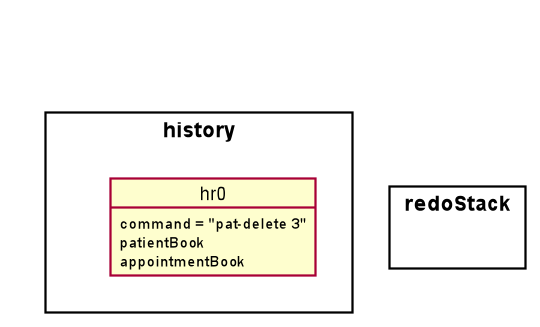
historyManagerStep 2: The user executes the command pat-delete 3.
After the DeleteCommand makes its changes on the model, logicManager calls Model#commit(MutatorCommand),
passing the command object into modelManager. In turn, modelManager passes the command object, stagedPatientBook,
and stagedAppointmentBook into historyManager through
HistoryManager#pushRecord(MutatorCommand, PatientBook, AppointmentBook).
historyManager uses those objects to create a new HistoryRecord object which contains the model state before the
command was executed (here labelled hr0) and pushes it into the history.
historyManager after pat-delete 3 is executedStep 3: The user executes the command visit-start.
The interaction between logicManager, modelManager and historyManager is the same as before.
historyManager creates a new HistoryRecord object (here labelled hr1) and pushes it into the history.

historyManager after visit-start is executedStep 4: The user wants to revert to the first item in the history, so he executes the command app-undo 1.
First, the UndoCommand retrieves the HistoryRecord corresponding to the first item in the history by searching the
list returned by Model#getHistory(). Then, UndoCommand calls Model#undoTo(HistoryRecord) passing in the target
record. When this happens, modelManager calls historyManager#popRecordsTo(HistoryRecord) to pop all records after
and including the target record from the history (hr1 and hr0 in the previous step). The historyManager uses
these popped records to create new records of the model state after the commands were executed, and places these
new records (hr2 and hr3) into the redoStack.
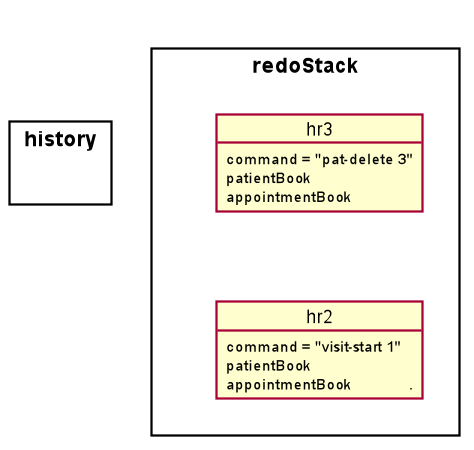
historyManager after app-undo 1 is executedFinally, modelManager calls ModelManager#changeBaseTo(PatientBook, AppointmentBook) using the state objects in the
target record. This performs the actual reversion of the state.
The action of the UndoCommand is summarised in the sequence diagram below:
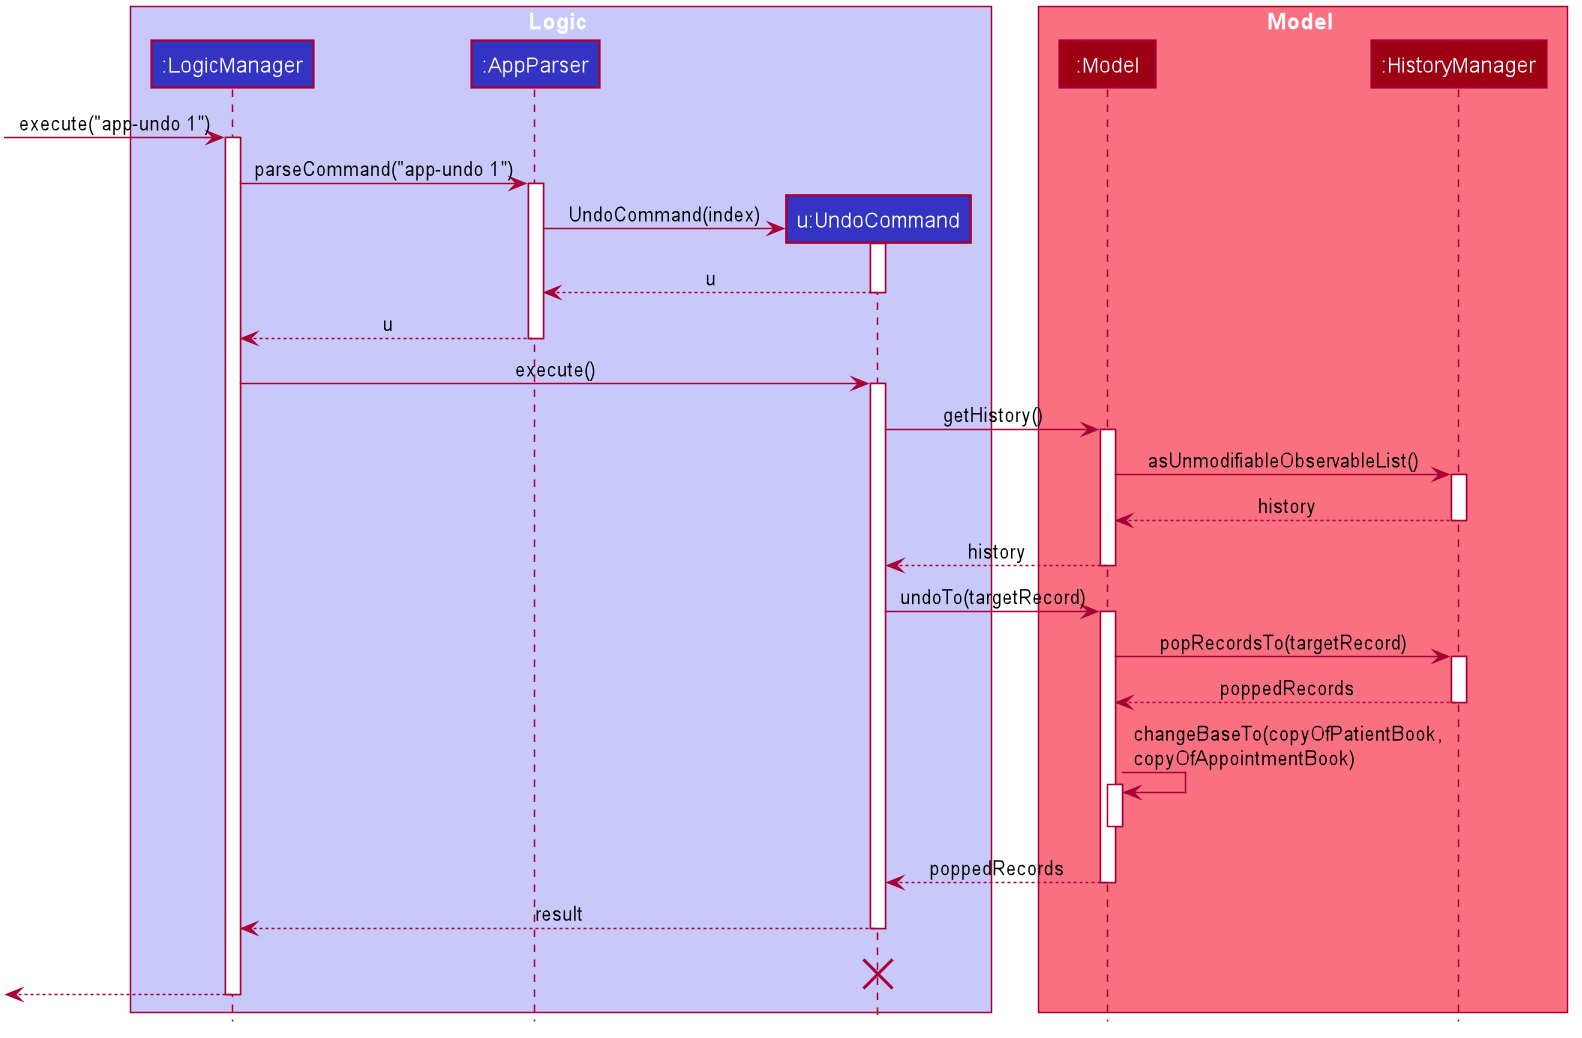
app-undoStep 5: The user wants to redo pat-delete 3, so he executes the command app-redo.
The RedoCommand calls Model#redo(). The modelManager calls HistoryManager#popRedo(PatientBook, AppointmentBook)
passing it the current stagedPatientBook and stagedAppointmentBook.
historyManager pops the record at the top of the redoStack (hr3) and uses its command, together with the
PatientBook and AppointmentBook just passed in by the modelManager, to create a new HistoryRecord (hr4)
describing the model state before that command was executed. It then pushes hr4 into the history.
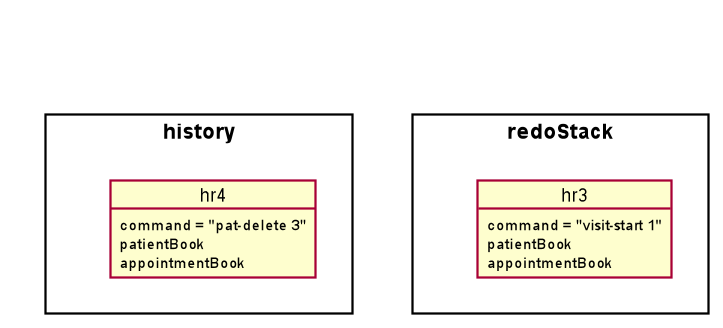
historyManager after app-redo is executedhistoryManager#popRedo() returns the HistoryRecord (hr3) containing the state after the redo. modelManager
can now call ModelManager#changeBaseTo() to change the state to it.
Step 6: The user executes the command pat-clear.
The action of the logicManager and modelManager is similar what is described in Step 2; only this time, when
modelManager calls HistoryManager#pushRecord(MutatorCommand, PatientBook, AppointmentBook), the
historyManager sees that the committing command is not an UndoCommand or a RedoCommand and clears the
redoStack to avoid branching.

historyManager after pat-clear is executed3.1.3. Model and Logic Design Considerations
Aspect: How to undo and redo between states
-
Alternative 1 (current choice): Save the entire
PatientBookandAppointmentBookobjects to record each model state.-
Pros: Easier to implement.
-
Cons: Consumes more memory.
-
-
Alternative 2: Only save the
MutatorCommandobjects but implement anundo()method for eachMutatorCommandwhich does exactly the reverse of itsexecute()method.-
Pros: Consumes much less memory.
-
Cons: Difficult to implement - doubles the amount of work needed for each command.
-
Aspect: How to record the PatientBook and AppointmentBook states in the history
-
Alternative 1: Simply store references to
PatientBookandAppointmentBook.-
Pros: Easier to implement.
-
Cons: Relies on the assumption that the objects in
PatientBookandAppointmentBookare immutable; if they are not truly immutable, changes to the current model’sPatientBookandAppointmentBookstate may leak and affect the states stored in the history.
-
-
Alternative 2 (current choice): Defensively store deep copies of the
PatientBookandAppointmentBook.-
Pros: Prevents improperly coded
PatientorAppointment(or their associated classes) from breaking undo/redo/history functionality. Can reuse JSON serialization code for persistent storage ofPatientBookandAppointmentBookto create deep copies by serializing then immediately deserializing them. -
Cons: Consumes more memory and CPU time. More difficult to implement - MVC pattern between UI view and models is broken in two. This is because each time the current state is swapped with a state in the history by
ModelManager, theObservableListviewed by the UI must also be updated by theModelManagerinstead of thePatientBookas the currentPatientBookis completely decoupled and placed into the history.
-
Aspect: Which class to place the HistoryManager in
-
Alternative 1 (current choice): Make
HistoryManagera field ofModelManager.-
Pros: Ensures atomicity of the records in the history as pushing a transaction to the
HistoryManagercan only be (and is always) done byModel#commit()itself - records in the history are guaranteed to be products of complete command execution rather than intermediate states. -
Cons: More difficult to test
ModelManageras twoModelManagerobjects may have the same current state but differingHistoryManagerobjects. May violate Single Responsibility Principle asModelManagernow has to manage both its current state and its previous states.
-
-
Alternative 2: Make
HistoryManagera field ofLogicManager.-
Pros: Higher cohesion as
ModelManageronly represents the model’s current state. Easier to testModelManageras only its current state matters. -
Cons: It is possible for intermediate model states to be pushed to the
HistoryManager- trustsLogicManagerto push the transaction to history after (and only after) callingModel#commit(). RequiresCommand#execute()to acceptHistoryManageras a parameter just soUndoCommandandRedoCommandcan work even though the vast majority of commands do not require it.
-
3.1.4. UI
The command history is constantly displayed in a panel on the right side of
the app. This HistoryPanel uses HistoryRecordCard s to display the
user-input text that invoked each command. It is a view of the ObservableList<HistoryRecord>
returned by HistoryManager#asUnmodifiableObservableList().
3.1.5. UI Design Considerations
Aspect: Where to display the history
-
Alternative 1 (current choice): Permanently display it in a dedicated panel.
-
Pros: User does not have to execute a 'history' command to view the history, making it much easier to use the multiple undo function.
-
Cons: Takes up more space in the UI.
-
-
Alternative 2: Display it as a tab in the
TabPane.-
Pros: Saves space in the UI.
-
Cons: User has to switch to the history tab to view it. Less intuitive UX as the other tabs in the
TabPaneall display actual data such asPatient,Visit, andAppointmentinfo, whereas history is app metadata.
-
3.2. Visits Management
Visit Management has 3 sections to it: the model that models the visits, the logic that allows users to manipulate these models and the UI.
3.2.1. Model
How Visits, VisitTodos and VisitTasks are stored can be seen in Section 2.4, “Model component” above. To support the feature of ongoing visits and the constraint that there can only be 1 ongoing visit at a time, a Pair<Integer, Integer> named pairOfOngoingPatAndVisitIndexes is stored in PatientBook. This serves multiple purposes:
-
To identify the
Patientthat is currently being visited and theVisitthat is ongoing -
To ensure that the state is saved even if the application shuts down during an ongoing visit
-
To ensure there is no duplication of data by storing only the indexes for reference
-
Although there is a reference to the
Patientin theVisitclass, this reference is only implied in the JSON file. To maximize efficiency such that the application does not have to search every patient to find an ongoing visit every time the application is opened, thePatientneeds to be stored together with theVisitas a pair inPatientBook.
Model implements the following operations:
-
Model#setNewOngoingVisit(Visit visit)— Record a new ongoingVisitof person in the model. ThisVisitmust be retrieved unmodified from aPatient, or anIllegalArgumentExceptionwill be thrown (so only use this to begin visits). -
Model#updateOngoingVisit(Visit updatedVisit)— Update an ongoingVisitin the model. This will update the ongoingVisitand update theVisitin thePatient. Use this to update an ongoingVisitwhen there is already aVisit. -
Model#unsetOngoingVisit()— Set the ongoing visit of person in the model and patient book to null (for cancelling or deleting visits). -
Model#patientHasOngoingVisit(Person person)— Returns true if the person has an ongoing visit. -
Model#getObservableOngoingVisitList()— Returns aObservableList<Visit>containing the ongoingVisitif there is an ongoingVisit.
3.2.2. Model Design Considerations
Aspect: How to reflect changes in ongoing visit on UI
-
Alternative 1 (current choice): Use an
ObservableList<Visit>returned fromFXCollections.observableArrayList().-
Pros: Easier to implement.
-
Cons: May not make logical sense as there will only be 0..1 ongoing
Visits at any point in time.
-
-
Alternative 2: Manually trigger an update every time the ongoing
Visitis updated.-
Pros: Makes logical sense as there will only be 0..1 ongoing
Visits at any point in time. -
Cons: Complex, increased coupling between UI and Model. These lead to an increase of work (and potentially errors) for the developer.
-
3.2.5. UI
A Patient 's Visit s, VisitTodo are displayed together with his details on pat-list and pat-find in a TitledPane.
An ongoing Visit is displayed in another tab named "Current Visit" using OngoingVisitListPanel containing OngoingVisitCard which contains VisitTaskTableView. Likewise, pat-list and pat-find use FinishedVisitCard s each containing a VisitTaskTableView to display the Visit s and VisitTask s.
Changing of tabs on running the appropriate command
The application currently does not change tabs when an appropriate command is run (e.g. if you’re on the Patient tab and you run visit-now-update, it will stay on the Patient tab). This is actually by design as it allows users to multitask across tabs.
If in future iterations there is a need to change the tab on running an appropriate command, there are some considerations on how to implement the changing of tabs programmatically (e.g. when someone executes the command to begin a visit), which necessitates some additional coupling between Model and Ui. The proposed implementation may be to use the Observer pattern: Model would contain a subject that would notify its observers whenever a component (e.g. Patient or Visit) is listed/added/updated/deleted/etc, and Ui could observer this subject and update itself accordingly.
3.2.6. UI Design Considerations
Aspect: How to display the Patient 's Visit records (and his VisitTodo s)
-
Alternative 1 (current choice): Embed it with
pat-listandpat-find.-
Pros: Easier to implement, convenient for user (don’t have to call methods such as
visit-viewwhich will only show the visit) -
Cons: May clutter screen.
-
-
Alternative 2: Implement functions such as
visit-viewetc.-
Pros: A cleaner result page from
pat-listandpat-find. -
Cons: Increased developer work and user will have to use multiple commands to view the
Patient'sVisitdata.
-
Aspect: How to display the ongoing Visit
-
Alternative 1 (current choice): Put the
PersonListPanelinto aTabPaneand put theOngoingVisitListPanelin the sameTabPane-
Pros: Neater.
-
Cons: No real cons apart from the fact that the user will have to click to change tabs.
-
-
Alternative 2: Open a new window to show the ongoing
Visit.-
Pros: Can be viewed side by side with the main application.
-
Cons: Increases clutter on user screen, increases complexity in handling scenario where user closes the window.
-
3.2.7. Use case
Visit Management is used when the user wants to visit a patient and record their visit. There are 4 actions that a user can perform:
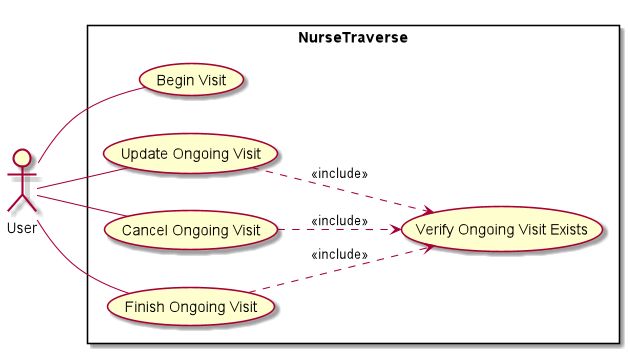
The possible workflow a user can take when these set of actions is depicted in the following diagram. Take note that the application will always start without an ongoing visit and this assumption is implied in the activity diagram. Also note that the terms "visit" and "ongoing visit" are interchangeable, as a user can only cancel, update or finish an ongoing visit.
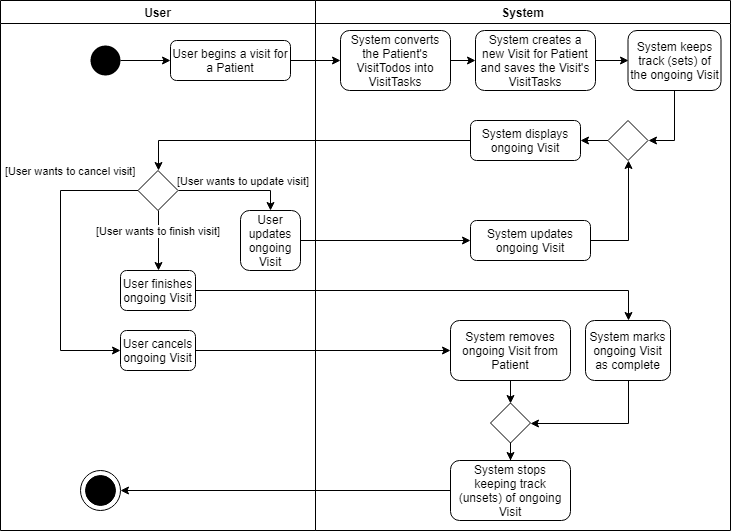
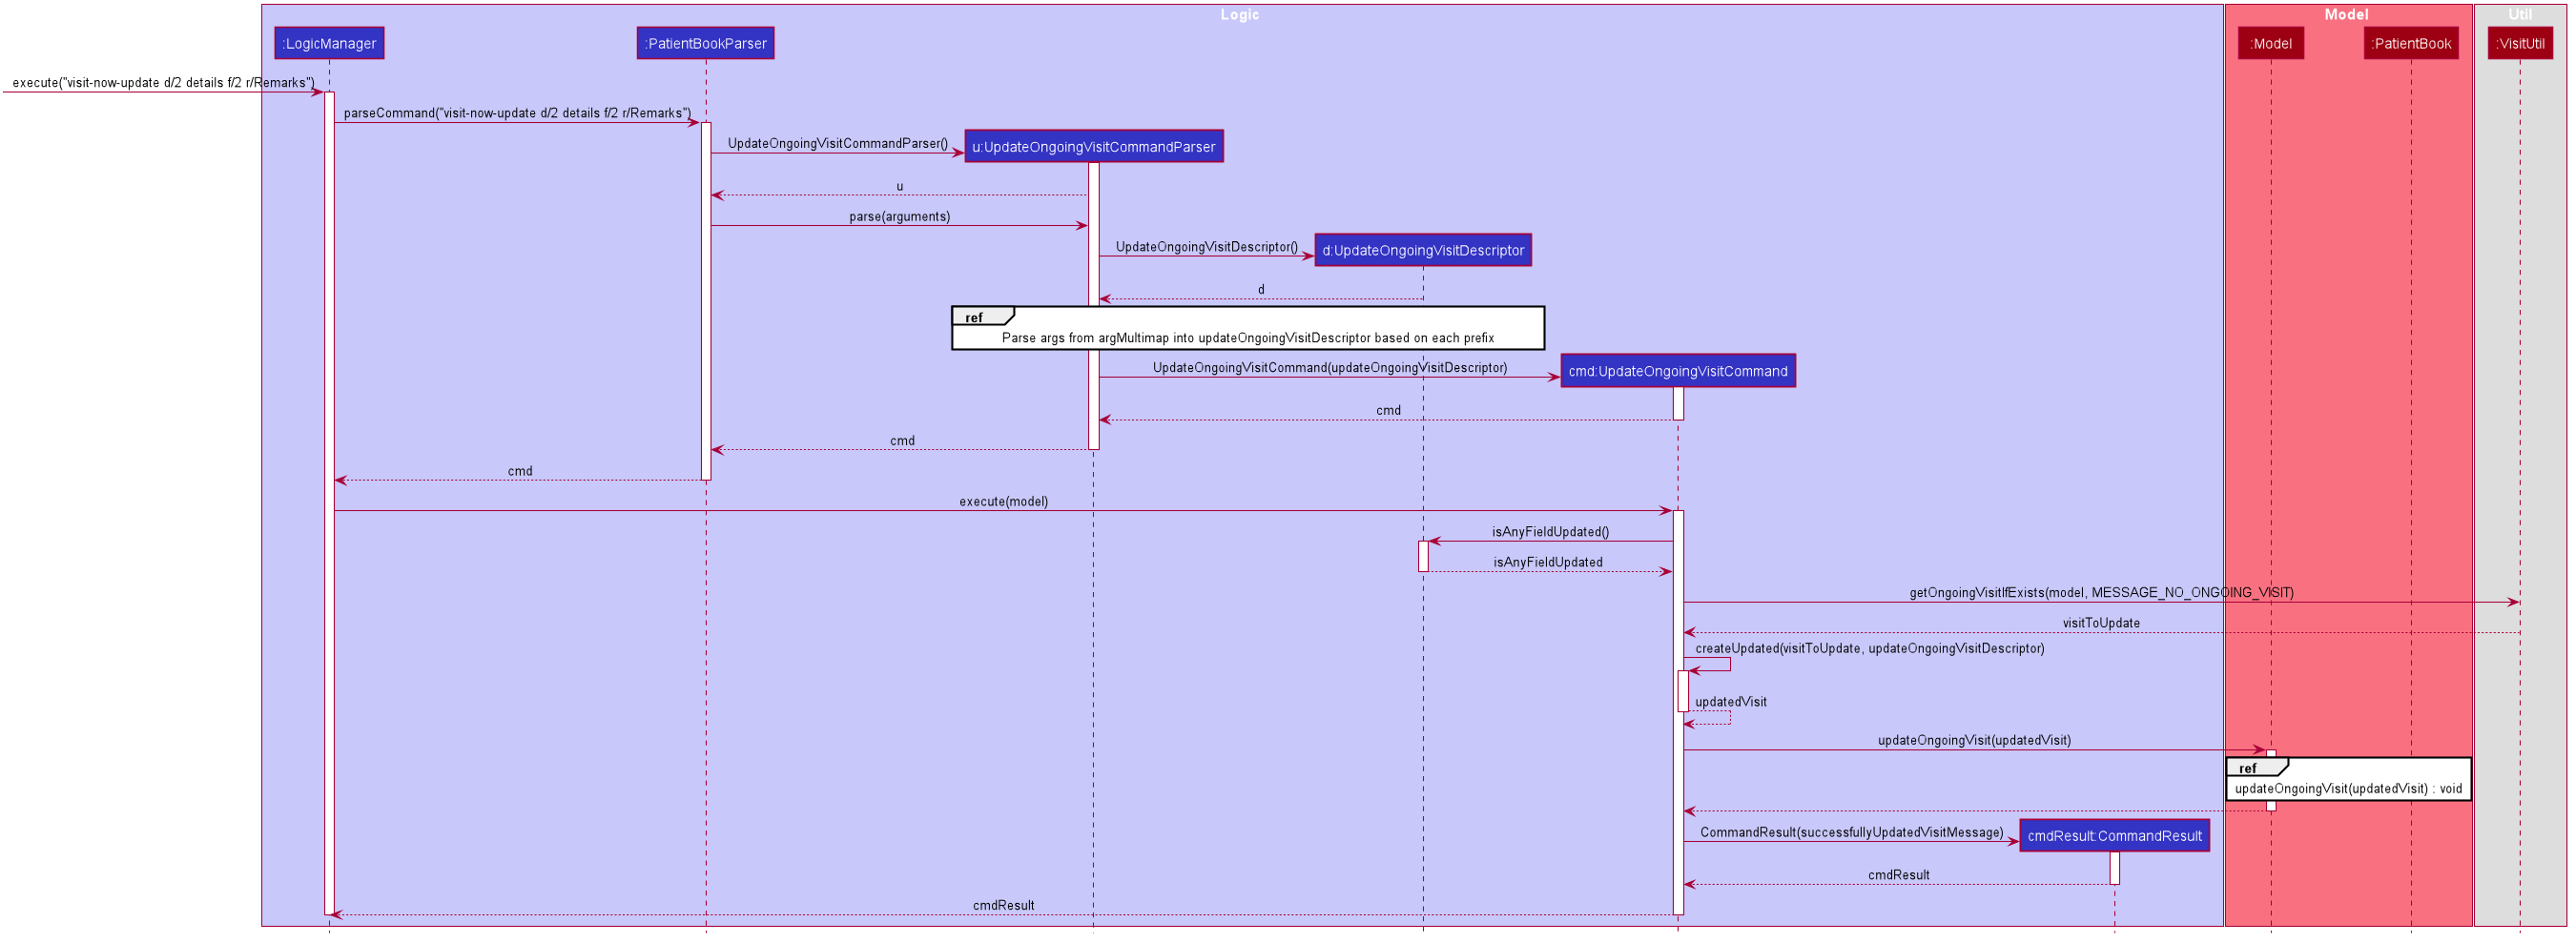
The most complex part of this use case is in when the user decides to update the ongoing visit. The sequence of events when updating an ongoing visit is detailed in this sequence diagram. Note that this sequence diagram is not exhaustive to help you understand without going into too much detail. (e.g. Exception handling is omitted and in-depth code is placed into ref fragments which are not included in this developer guide).
3.3. Appointment Management
3.3.1. Implementation Overview
The appointments management feature is facilitated primarily by the AppointmentBook, a class that implements the ReadOnlyAppointmentBook interface and wraps around all appointments data of the app.
This is a new book (different from the PatientBook) that is now required by the ModelManager class for instantiation along with UserPrefs and PatientBook. The AppointmentBook is, therefore, a field in the ModelManager class.
The AppointmentBook has appointments, which is a UniqueAppointmentList, as a private field that holds all appointments currently in the AppointmentBook as a unique list. This list is modified from certain method calls in the ModelManager class.
3.3.2. Model
The main operations in the AppointmentBook are exposed to in the Model interface. Model implements the following operations to accommodate for the inclusion of the AppointmentBook and its related methods:
-
Model#setStagedAppointmentBook(ReadOnlyAppointmentBook appointmentBook)— Replaces appointment book in the Model with data from theReadOnlyAppointmentBook appointmentBookpassed in as argument. -
Model#replaceStagedAppointmentBook(List<Appointment> appointments)— Replaces all appointments in appointment book with new appointments from the list. -
Model#getStagedAppointmentBook()— Returns the current AppointmentBook. -
Model#hasAppointment(Appointment appointment)— Returns true if an appointment with the same identity as the appointment passed in as argument exists in the appointment list. -
Model#hasClashingAppointment(Appointment appointment)— Returns true if any appointment in the appointment list has clashing time with theappointmentpassed in as argument. -
Model#deleteAppointment(Appointment target)— Deletes the given appointment. If the thetargetappointment is recurring, then the appointment is recurred and the next one is added to the appointment list. -
Model#deleteRecurringAppointment(Appointment target)— Deletes the given recurring or non-recurring appointment permanently. -
Model#deleteAppointments(Patient target, Index targetIndex)— Deletes all appointments associated with thetargetpatient. -
Model#addAppointment(Appointment appointment)— Adds the given appointment. The appointment passed in as argument must not already exist in the appointment list. -
Model#setAppointment(Appointment target, Appointment editedAppointment)— Replaces the given appointmenttargetwitheditedAppointment.targetmust exist in the appointment list. The appointment identity ofeditedAppointmentmust not be the same as another existing appointment in the appointment list. -
Model#setAppointments(Patient patientToEdit, Patient editedPatient)— Replaces all appointments' patients that equalpatientToEditwitheditedPatient. -
Model#ObservableList<Appointment> getStagedAppointmentList()— Returns an unmodifiable view of the entire appointment list. -
Model#FilteredList<Appointment> getFilteredAppointmentList()— Returns an unmodifiable view of the filtered appointment list. -
Model#void updateFilteredAppointmentList(Predicate<Appointment> predicate)— Updates the filter of the filtered appointment list to filter by the givenpredicate.
3.3.3. Model Design Considerations
Aspect: Where to wrap all appointments data in
-
Alternative 1 (current choice): Create
AppointmentBookto wrap around all appointments and add it as a field ofModelManager.-
Pros:
-
Splitting the
AddressBookintoPatientBookandAppointmentBookclearly demarcates the handling of patients and appointments separately. -
When there are changes made to the appointments, only the
AppointmentBookis modified, i.e. there is no need to, for example, refresh the data for patients.
-
-
Cons:
-
Overhead of more methods in the
Modelneeded separately for the changes made in theAppointmentBook. -
Major refactoring was needed in many classes and tests since there were changes to the constructor and fields of the
ModelManager.
-
-
-
Alternative 2: Modify the original
AddressBookto have two unique lists as fields within it, one for patients and one for appointments.-
Pros:
-
The number of extra methods added to the
Modelcould have been reduced since some methods may do the same operation on both appointment and patient lists.
-
-
Cons:
-
Principle of separation of concerns may be violated.
-
Optimization might be compromised, since methods intended to operate only on the specific patient or appointment lists might operate on the whole
AddressBookunnecessarily.
-
-
3.3.4. Logic
The following logical Parser classes to parse user commands' arguments, and the corresponding Command classes they returned were implemented:
-
FindAppointmentParserreturnsFindAppointmentCommand- Finds and lists all appointments in appointment book whose name contains any of the argument keywords.
TheCOMMAND_WORDfor this command isappt-find. -
AddAppointmentParserreturnsAddAppointmentCommand- Adds an appointment to the appointment list.
TheCOMMAND_WORDisappt-add. -
EditAppointmentParserreturnsEditAppointmentCommand- Edits the details of an existing appointment in the appointment book.
TheCOMMAND_WORDisappt-edit. -
DeleteAppointmentParserreturnsDeleteAppointmentCommand- Deletes an appointment identified using it’s displayed index from the appointment book. For recurring appointments, the recurring appointment is deleted and the next recurred one is added to the appointment list.
TheCOMMAND_WORDisappt-delete. -
DeleteAppointmentPermanentlyParserreturnsDeleteAppointmentPermanentlyCommand- Deletes permanently a recurring appointment identified using it’s displayed index from the appointment book.
TheCOMMAND_WORDisappt-delete-permanent. -
ListAppointmentCommand- Lists all appointments in the appointment book. Note: TheListAppointmentCommanddoes not have a parser as it does not have any arguments to parse.
TheCOMMAND_WORDisappt-list.
3.3.5. Logic Design Considerations
Aspect: Deleting recurring appointments permanently
-
Alternative 1 (current choice): Create
DeleteAppointmentPermanentlyParserandDeleteAppointmentPermanentlyCommandas new classes independent of theDeleteAppointmentParserandDeleteAppointmentCommandclasses.-
Pros:
-
A simple solution that clearly separates cases of when an appointment is deleted permanently from the list versus when the appointment is deleted and the recurred next appointment is added to the list.
-
-
Cons:
-
Does not really separate the cases of recurring appointments from non-recurring ones since
appt-delete-permanentcan be applied on both recurring and non-recurring appointments. -
There might be fragments of code in both classes that are common and could be extracted out and reused instead.
-
-
-
Alternative 2: Create
DeleteAppointmentPermanentlyParserandDeleteAppointmentPermanentlyCommandas new classes that now extend from theDeleteAppointmentParserandDeleteAppointmentCommandclasses.-
Pros:
-
By extending, code reusability is increased.
-
It also makes sense in terms of class structure for such an extension, since deleting an appointment permanently is a more specific case of deleting an appointment and also allowing to recur it and then add it back (if it was a recurring appointment).
-
-
Cons:
-
This still does not resolve the issue of separation deletion of recurring appointments from non-recurring ones.
-
Despite extending, there may not be too much code overlap. Also, considering that new methods will have to be added to the
Modelfor each case of permanent and non-permanent deletion, the extension might well prove to be unecessary.
-
-
-
Alternative 3: Create
DeleteRecurringAppointmentParserandDeleteRecurringAppointmentCommandas new classes independent from theDeleteAppointmentParserandDeleteAppointmentCommandclasses.
ButDeleteRecurringAppointmentCommandcan only be applied to appointments that are recurring.-
Pros:
-
Demarcates recurring and non-recurring appointments deletion better since the user will now have only one way to delete non-recurring appointments, i.e. through
appt-delete.
-
-
Cons:
-
Can be a bit restrictive since one command is reserved for only recurring appointments.
-
The names of these classes can be a bit misleading since
appt-deletecan still be applied on both recurring and non-recurring appointments.
-
-
3.3.6. Storage
The AppointmentBook and Appointment class have the JsonSerializableAppointmentBook and JsonAdaptedAppointment classes respectively to allow saving of appointments data to appointmentBook.json and reading data from it.
|
The reading of appointments data from storage currently does not check if there are clashing appointments.
Hence, any modifications to the |
3.3.7. Storage Design Considerations
Aspect: How to handle appointments that have finished (i.e. are before the system date and time)
-
Alternative 1 (current choice):
AppointmentBookhas two fields ofUniqueAppointmentList:appointmentsandfinishedAppointments.
When data is read from the storage, all appointments that are past the system date and time are stored in theappointmentslist, while those that are finished are stored in thefinishedAppointmentslist.
After the app is closed, all appointments in thefinishedAppointmentslist are not saved.-
Pros:
-
Ensures a clear distinction between appointments that have finished and those that are still only scheduled and yet to happen. *
-
-
Cons:
-
Throws away the finished appointments every time app is closed.
-
No indication to the user that certain appointments finished and so are no longer displayed in the list of appointments.
-
-
-
Alternative 2: As before, but once the app is closed, appointments both in
appointmentsandfinishedAppointmentslist are saved.-
Pros:
-
Still ensures a clear distinction between appointments that have finished and those that are still only scheduled and yet to happen.
-
Keeps the finished appointments.
-
-
Cons:
-
Might need to handle the reading and saving of the finished appointments differently from the main appointment list.
-
Need to consider whether user deleting an appointment implies the user wants it marked as finished or wants to remove it completely. If the former is the case, the delete appointment command would need to modify the
finishedAppointmentslist, and that is an overhead.
-
-
3.3.8. UI
The list of Appointment s are displayed on a separate tab in the app.
3.4. Use Case
Appointment Management is used when the user wants to schedule an appointment with the patient. There are 6 actions that a user can perform:
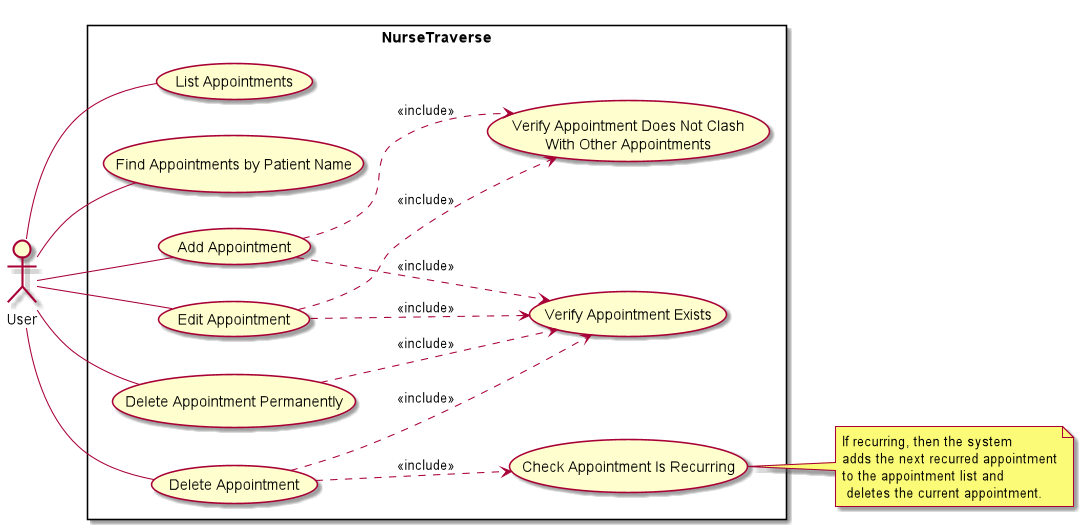
Perhaps the most complex workflow is when a user deletes a recurring appointment.
In doing so, as indicated in the Use Case diagram above, the appointment is first deleted from the list of appointments.
The appointment is then recurred to get the next appointment (i.e. with the next start and end date time), and added to the list of appointments by directly calling the AppointmentBook#addRecurringAppointment method.
Assuming the first appointment in the appointment list is recurring. The following sequence diagrams show the object interactions for user command appt-delete 1:
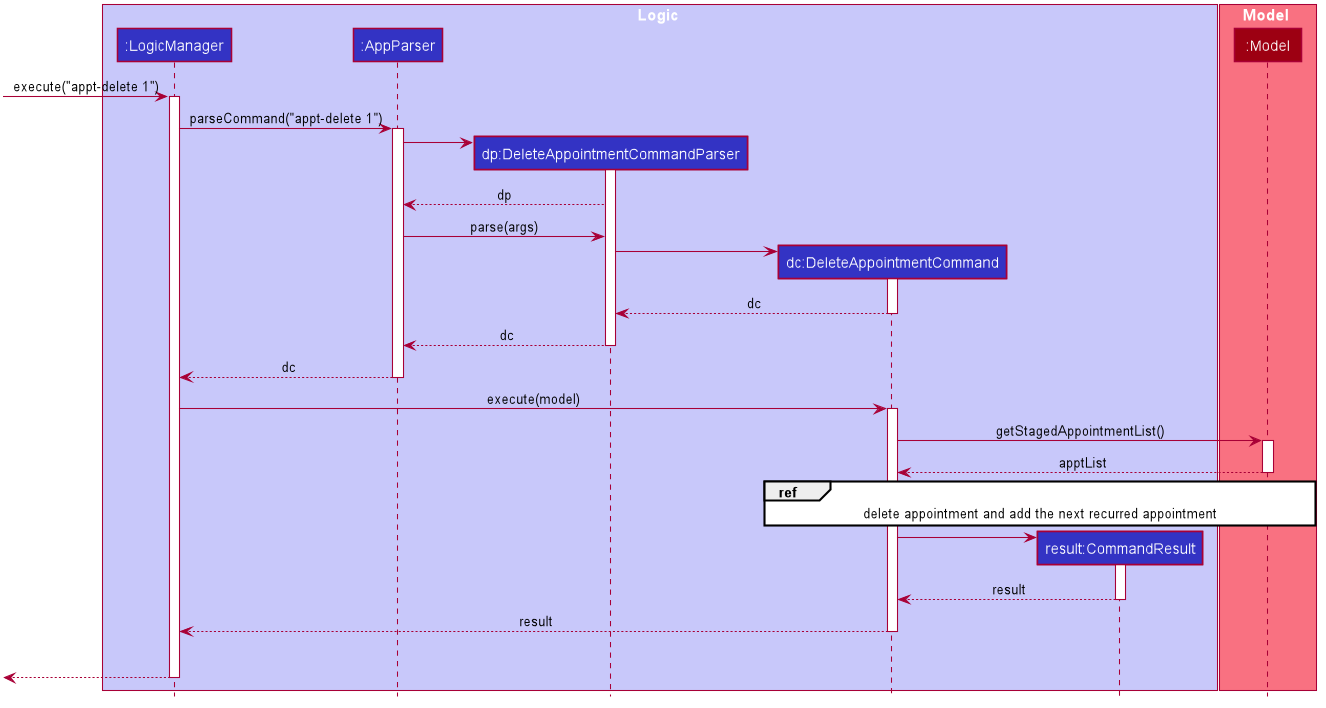
Figure: Delete Appointment Sequence Diagram
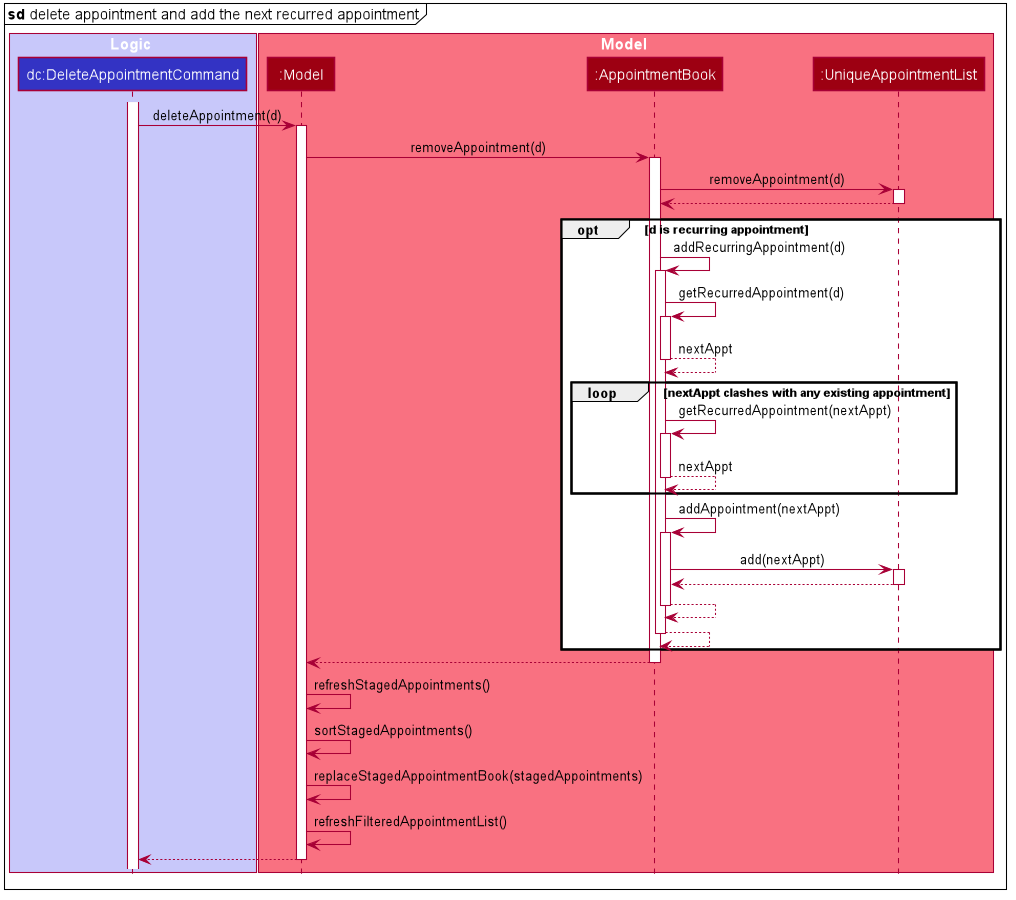
Figure: Reference - delete appointment, recur, and add the recurred appointment
3.5. Import and Export
Import and export functionality are split into three commands:
-
app-export -
app-import-replace -
app-import-merge
3.5.1. Jackson Library
The current import and export features are built upon the the existing Jackson libraries,
in particular the dataformat, databind and datatype modules. Technical knowledge of the
Jackson library will be helpful for maintenance of feature, but is not necessary.
However, understanding Jackson 's annotations will be needed in order to extend export and import
functionality to cover new data fields or classes implemented in the future. They are explained
here.
3.5.2. Csv Processing
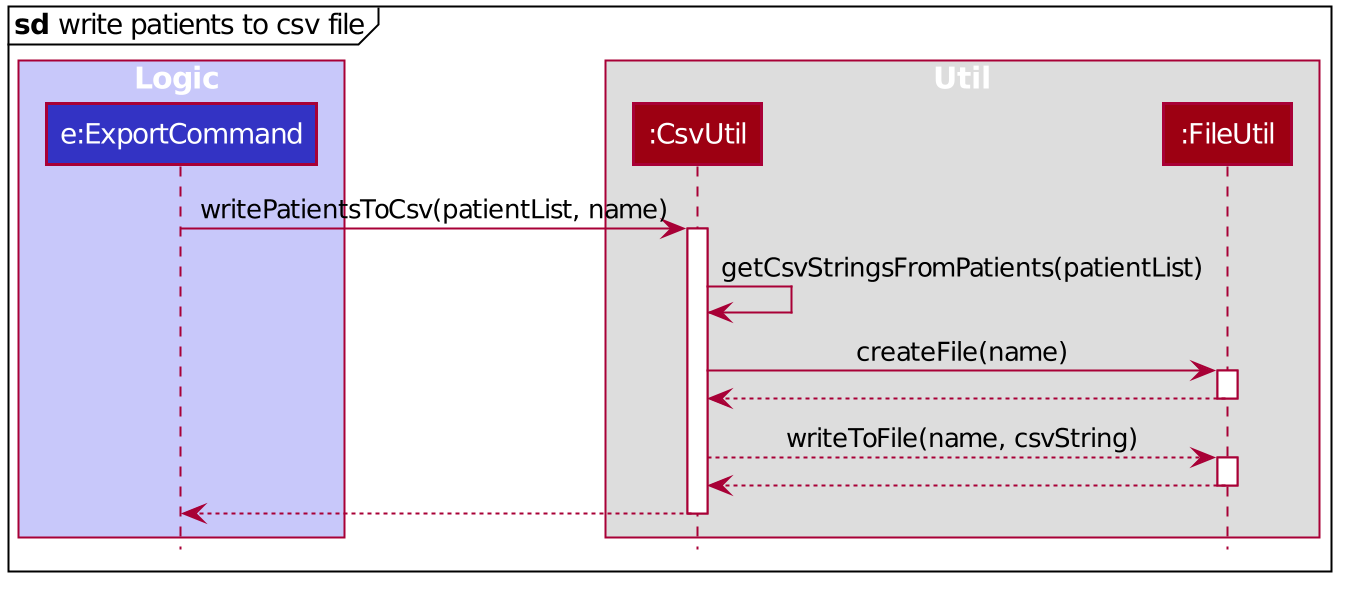
All of the data processing needed for this feature can be found in the CsvUtil file;
it is responsible for converting the data of Patient objects into a .csv friendly String format
and vice versa. The actual reading and writing of .csv files is then done with existing
FileUtil functionality.
The conversion of Patient objects to and from .csv formatted Strings are handled by
the CsvMapper and CsvSchema classes implemented in dataformat.
-
The
CsvMapperis responsible for managing custom configurations for the conversions. For instance, it can toggle headers withwithHeader()and skip unknown fields with theIGNORE_UNKNOWNfeature, both of which are used in the feature implementation. -
The
CsvSchemaobject is created by a configuredCsvMapperobject and anObject.class, in this case,Patient.class. It dictates the scheme for how data in each column of the .csv corresponds with the fields in the Object class. This schema can then be used to instantiate a reader or a writer object.
The following functions are implemented:
-
CsvUtil#writePatientsToCsv(List<Patient>, String)— Write a list ofPatientobjects into a .csv file to the path at the specifiedpathString. -
CstUtil#readPatientsFromCsv(String)— Read a .csv file at the specified path indicated bypathStringand return a corresponding list ofPatientobjects. -
importsContainDupes(List<Patient>)— Check if the given list contains duplicate patients, i.e. the list is not unique.
3.5.3. Csv Processing Design Considerations
-
Alternative 1 (current choice): Use
Jackson'sdataformat.csvlibrary.-
Pros: Well integrated with the existing
JacksonJSON parsing libraries. Tons of functions for CSV parsing. -
Cons: Does not support Excel formats. Comprehensive library, recently updated but not well-documented. Hard to understand.
-
-
Alternative 2: Use other libraries, like Apache Commons CSV.
-
Pros: More features like Excel format parsing. Well documented.
-
Cons: Does not integrate well with the existing
Jacksonlibraries used.
-
-
Alternative 3: Build your own parser!
-
Pros: Lightweight, implement only what is needed. Can be white box tested.
-
Cons: Lots of developer work to reinvent the wheel. Likely to be buggy as there are tons of edge cases to consider, due to many special characters.
-
3.5.4. Command Implementation
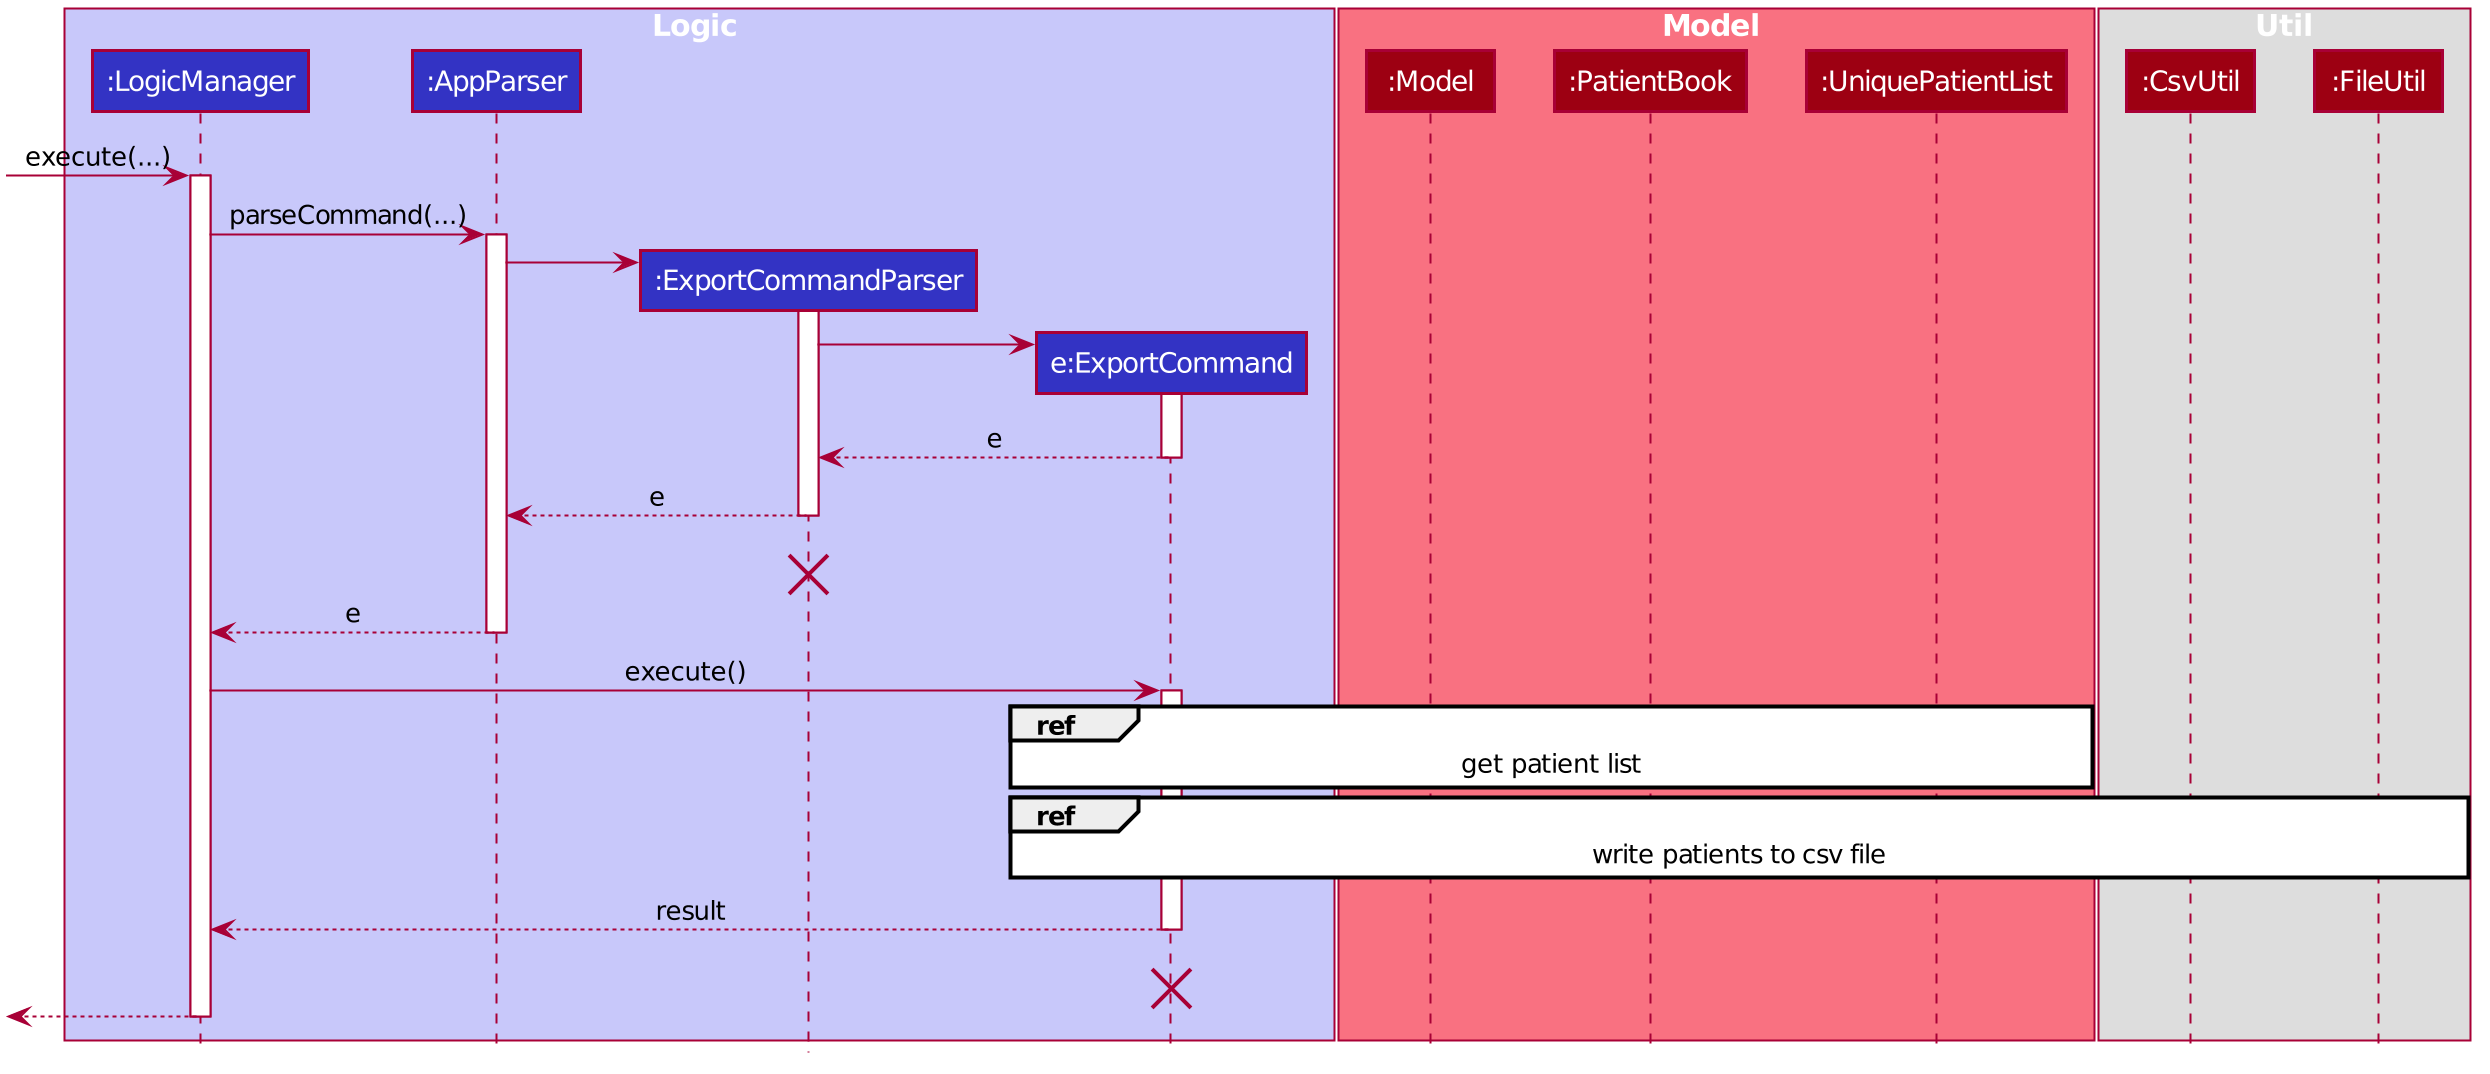
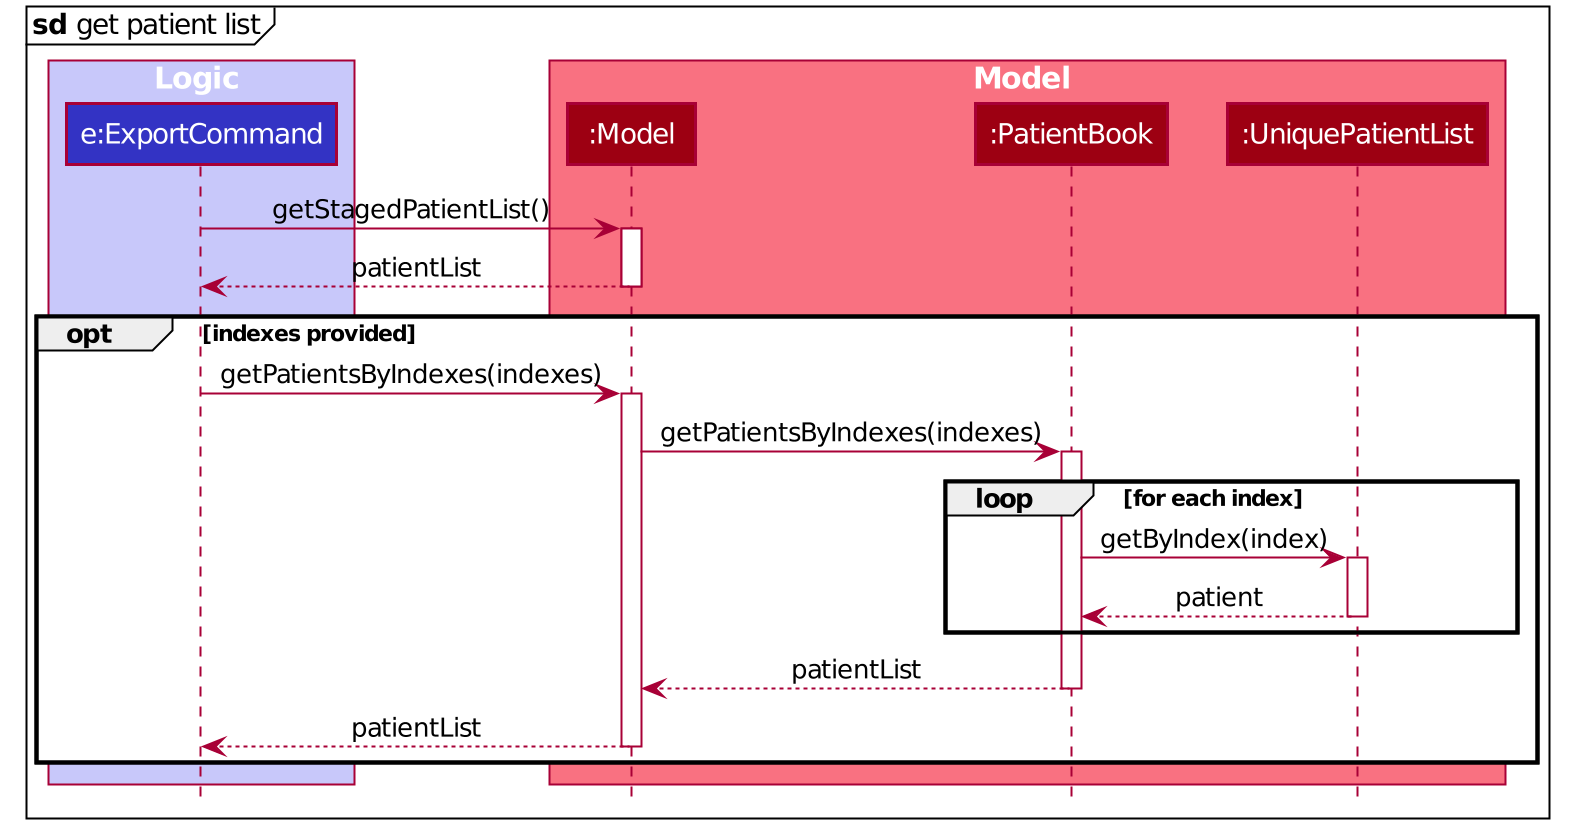
Command: app-export
The app-export command works by retrieving a list of Patient objects from the Model and
passing it to CsvUtil to process and write into a .csv file. If provided with indexes, the
app-export feature can selectively export the Patient objects that correspond to the
specified indexes.
To facilitate the selective export functionality, the following methods were implemented in
Model and PatientBook.
-
Model#GetPatientsByIndexes(Set<Indexes>)— Retrieves and returns a list ofPatientobjects corresponding to the provided indexes from thePatientBook, if the indexes are valid. -
PatientBook#GetPatientByIndex(Index)— Returns thePatientobject corresponding to the specified index, if the index is valid.
If indexes are not specified in the command arguments, a list of all currently existing Patient
objects will be retrieved with Model#getStagedPatientList().
The app-export command MUST be provided with a desired file name for the .csv file. The .csv
file will be written to /exports/[FILENAME].csv. Existing files will NOT be overridden and
thus the provided file name cannot already exist in /exports.
The following diagrams show how an export command works:
ExportCommand Design Considerations
Aspect: File Overriding
-
Alternative 1 (current choice): Disallow overriding, file name provided must be new
-
Pros: Existing .csv files will not be accidentally overridden. Prevents potential loss of data.
-
Cons: Additional hassle for the user to delete files that they want to replace.
-
-
Alternative 2: Allow overriding
-
Pros: Conveniently replace existing, unused files.
-
Cons: May accidentally override and lose important data.
-
Aspect: Illegal Characters in Data Fields
-
Alternative 1 (current choice): Allow forbidden characters
-
Pros: Certain fields may be more accurately represented, i.e. addresses.
-
Cons: The exported csv file may be bugged in edge cases, i.e. have data in the wrong columns. Exported fields with forbidden characters may not be properly handled and escaped all of the time. More developer work to test around edge cases.
-
-
Alternative 2: Disallow forbidden characters
-
Pros: Exported .csv files are guaranteed to be in the correct format.
-
Cons: Data fields are restricted and cannot have commas, semi-colons, etc.
-
Import
The import commands work by reading a .csv file and converting it into a list of Patient
objects by using CsvUtil. The list is then passed to Model. What happens next depends
on which variant of import is called.
For both variants of the command, the imported list of patients CANNOT have any duplicates.
This is ensured with CsvUtil#importsContainDupes(List<Patient>).
Command: app-import-replace
The Model will replace all existing Patient data in the PatientBook with the data
of the new list of Patient objects. To do this, the following was implemented:
-
Model#replaceStagedPatientBook(List<Patient>)— Creates a newPatientBookobject containing thePatientobjects in the provided list. The oldPatientBookstored in theModelis then replaced with the newPatientBookby callingModel#setStagedPatientBook(PatientBook).
Command app-import-merge
The Model will add all Patient data in the new list of Patient objects into the
PatientBook. To do this, the following was implemented:
-
Model#hasAnyPatientInGivenList(List<Patient>)— Checks if the model contains anyPatientin the given list ofPatientobjects. -
Model#addPatients(List<Patient>)— Adds allPatientobjects in the given list into theModel.
If the operation will result in duplicate Patient objects in the PatientBook,
it will not be executed. This is checked by the function stated above,
Model#hasAnyPatientInGivenList(List<Patient>).
Import Design Considerations
Aspect: Allowing Patient Overriding for app-import-merge
-
Alternative 1 (current choice): Disallow overriding.
-
Pros: Existing
Patientdata will not be accidentally overridden. No need to deal with potential merge conflicts. -
Cons: User may have intended to use
app-import-mergeto update old data. More hassle for the user to delete oldPatientdata that they want to replace.
-
-
Alternative 2: In case of duplicates, replace old
Patientdata.-
Pros: Conveniently update old
Patientdata. -
Cons: May accidentally override and lose important data, though not a big deal with
app-undo.
-
-
Alternative 3: Implement a flag to toggle overriding.
-
Pros: Best of both worlds.
-
Cons: More coding and debugging work.
-
3.7. Overview Of Implementation
The auto-complete mechanism extends NurseTraverse with 3 functionalities
-
Completing word in command box
-
Suggesting of words that are compatible with previous sub-commands
-
Guide for user to select from the various sub-commands
Given below is an example usage scenario of autocompletion
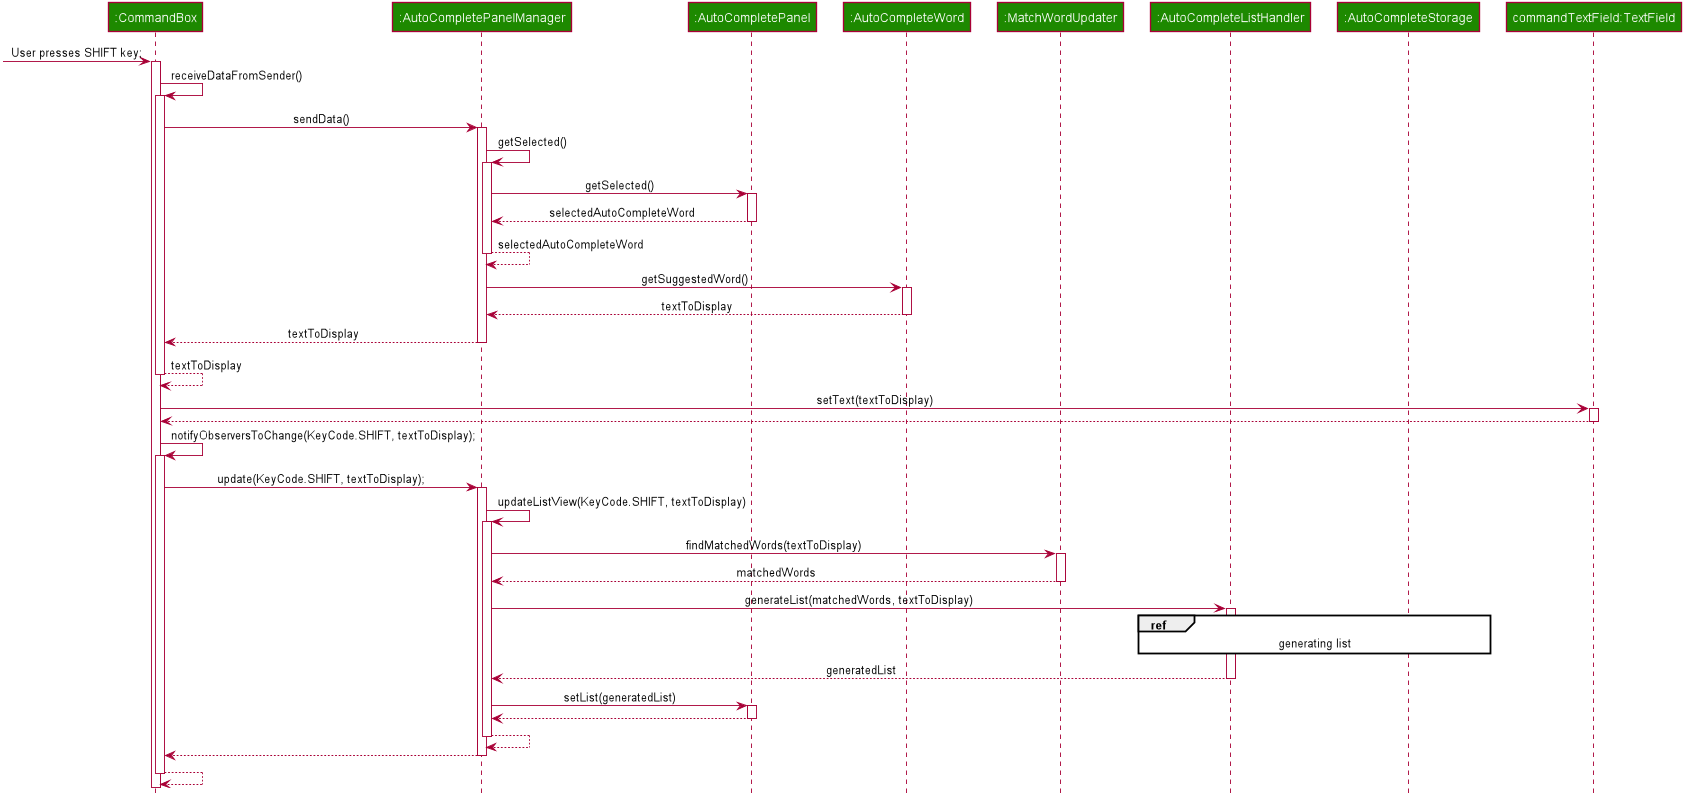
Step 1:
When the user launches the application, an instance of the object, command and prefix autocomplete word list will be initialised in AutoCompleteStorage, which implements the following operations:
-
AutoCompleteWordStorage#getOListAllCommandWord()— returns the observable list of command words stored -
AutoCompleteWordStorage#getOListAllPrefixWord()— returns the observable list of prefix words stored -
AutoCompleteWordStorage#getOListAllObjectWord()— returns the observable list of object words stored -
AutoCompleteWordStorage#generateOListAllIndexWord(String objectName)— generate an observable list of index words corresponding to previous object word when called
The auto-complete panel will be set to object list when user first start the application.
Step 2: Whenever user types a key in the command line, CommandBox will notify AutoCompletePanelManager to perform changes based on userinput
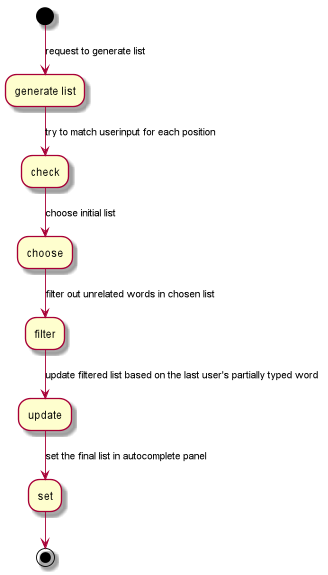
This will update the number of matched words with the current list and 3 sets of algorithms will be run
-
AutoCompleteListHandler#chooseList()
→ Based on the number of matched words(pre-processed in theAutoCompletePanelManager)
→ List will be chosen fromAutoCompleteStorage -
AutoCompleteListHandler#filterList()
→ The chosen list will then be filter to only words that are compatible with previous correctly typed full words.
→ This is done by iterating through all the matched word and checking ifAutoCompleteWordhas a list of associated words
→ If theAutoCompleteWordhas a list of associated words, this method will attempt to match the associated words with the matched words while filter out all incompatible words in the chosen list in the process
(Eg: prefix list will be filtered to only be compatible with “pat-add” user command, the words that come before prefix.) -
AutoCompleteListHandler#updateList()
→ Update the filtered list to fit the last partially typed word
→ The last partially typed word inCommandBoxwill be checked against the filtered list
→ If the word in the filter list does not start with the last partially typed word, it will be filtered out
(Eg: User typed “pat-ad”. “add” and “add-medcon” which are both in the current list will be suggested since they both starts with "ad".)
The following sequence and activity diagrams illustrates the general flow when user input is detected
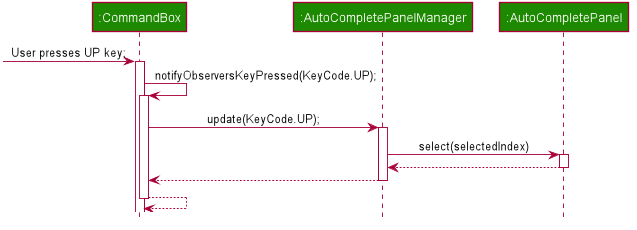
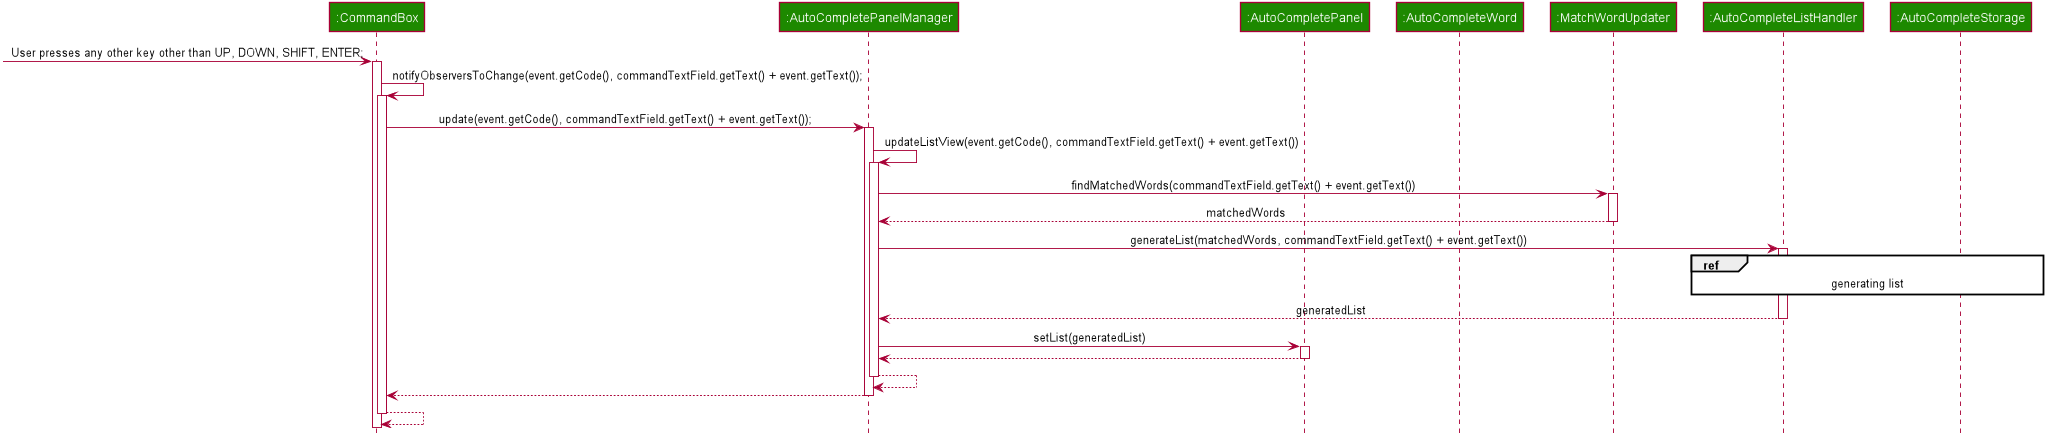
Shown below is the sequence diagram for the guided system when selecting suggestion word
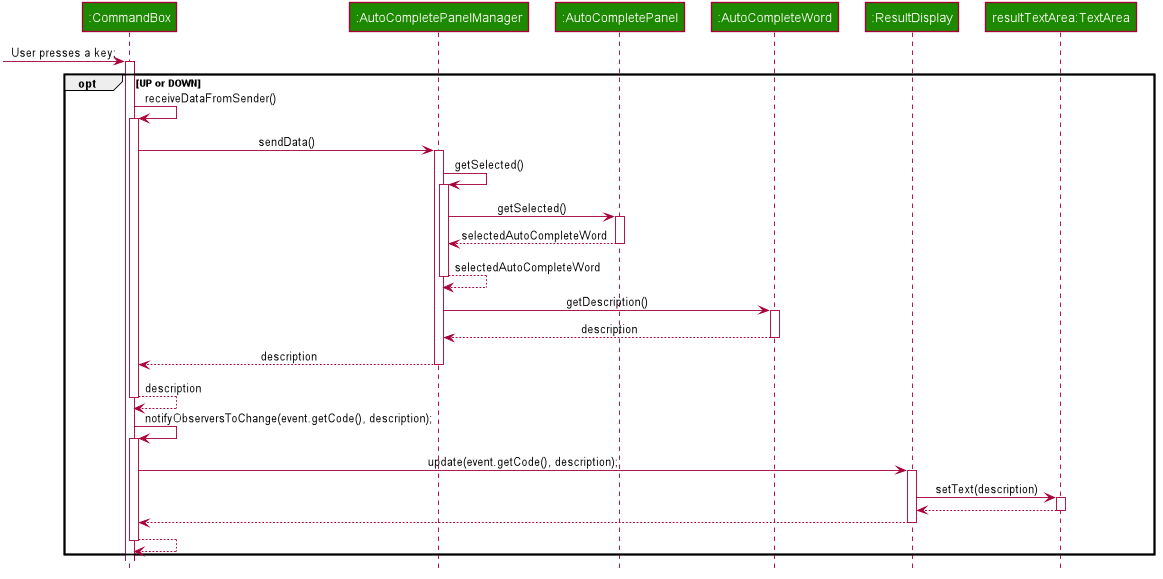
3.8. Design Considerations
Aspect: Communication between UiPart s
(CommandBox, AutoCompletePanel and ResultDisplay)
-
Alternative 1: Pass references of each UiParts components around
-
Pros: Simpler to call methods as required, code will be easier to understand and implementation will take less effort
-
Cons: Code will be harder to track since any component with reference to the UiPart can manipulate its property
-
-
Alternative 2(current choice): Implement facades and observer patterns
-
Pros: Code is easier to maintain
-
Cons: Less readability
-
3.9. Logic Design Considerations
Aspect: Method to suggest auto-complete words
-
Alternative 1: Have several lists. First word list, Second word list, etc
-
Pros: Minimal effort in parsing of command line input.
-
Cons: Auto-complete panel will be unorganised. Eg: both index 1 and prefix may be suggested instead of just all index or all prefix suggested.
-
-
Alternative 2: Suggest full commands such as pat-edit 2 n/ t/ .. and omit any list
-
Pros: Easy to implement. No parsing required.
-
Cons: Auto-complete panel will be chunky as all commands are suggested at the same time. User will not be guided in selecting which command to choose.
-
-
Alternative 3(current choice): Have several lists. Object/Command/Index/Prefix lists.
-
Pros: User will be guided. Very user friendly. Panel will be more organised as words are suggested in sets of the same type.
-
Cons: Parsing of command line input can be tedious.
-
3.10. UI Design Considerations
Aspect: Location of autocomplete panel
-
Alternative 1: Place it as a floating window
-
Pros: User is able to resize and can be moved around easily
-
Cons: A floating window may block out some of the UI of the application, and user will have to re-place the autocomplete panel every time the application starts
-
-
Alternative 2(current choice): Fix it permanently at a pre-set location
-
Pros: Simpler and user will get use to the its location easier since it is pre-set
-
Cons: Less customisable for user
-
3.11. Logging
We are using java.util.logging package for logging. The LogsCenter class is used to manage the logging levels and logging destinations.
-
The logging level can be controlled using the
logLevelsetting in the configuration file (See Section 3.12, “Configuration”) -
The
Loggerfor a class can be obtained usingLogsCenter.getLogger(Class)which will log messages according to the specified logging level -
Currently log messages are output through:
Consoleand to a.logfile.
Logging Levels
-
SEVERE: Critical problem detected which may possibly cause the termination of the application -
WARNING: Can continue, but with caution -
INFO: Information showing the noteworthy actions by the App -
FINE: Details that is not usually noteworthy but may be useful in debugging e.g. print the actual list instead of just its size
3.12. Configuration
Certain properties of the application can be controlled (e.g user prefs file location, logging level) through the configuration file (default: config.json).
4. Documentation
Refer to the guide here.
5. Testing
Refer to the guide here.
6. Dev Ops
Refer to the guide here.
Appendix A: Product Scope
Target user profile:
-
community nurse
-
needs to manage a significant number of homebound patients
-
has a need to manage patients’ profile efficiently
-
has flexibility in scheduling appointments
-
is reasonably comfortable using CLI apps
Value proposition: Makes managing patients’ data more orderly, efficient and tidy
Appendix B: User Stories
Priorities: High (must have) - * * *, Medium (nice to have) - * *, Low (unlikely to have) - *
| Priority | As a … | I want to … | So that I can… |
|---|---|---|---|
|
user |
see the next-of-kin contact (address, name, phone) associated with each patient |
inform them in case of any emergency situations |
|
user |
track the addresses of my patients |
I will not forget them |
|
user |
keep track of the dosages of medications of my patients |
I know exactly what they need to take |
|
user |
see my schedule of appointments for a day |
I know when to go where |
|
user |
see all my patients’ medications in a list |
I can pack my bags in advance of each trip |
|
user |
see the medical conditions of each patient so that |
I know how to care for them |
|
user |
record details (these details can be broken down) about the visit (e.g. environmental conditions, patient’s symptoms, warning signs) |
I can better monitor the patient’s situation |
|
user |
save my data automatically after each change |
data doesn’t get lost if I forgot or am not able to save after a session |
|
user |
take personal notes for each patient |
I can take note of their personal quirks and needs |
|
user |
use a todo list / checklist to keep track of what I have to do when I visit a patient |
I won’t forget or miss out on any important tasks when I visit them |
|
user |
I want to keep track of todos I have done |
I will have documentations to fall back on if i need them |
|
user |
have a manual for how to do certain tasks (e.g. clean wounds / first aid |
I am better prepared in times of emergency |
|
user |
have a manual on medical conditions |
I am better prepared to advise patients about their medical condition |
|
user |
keep a photo of each patient so I can |
remember them better |
|
user |
alert or send reminders to patients to take any prescribed medication so that |
they take their medication on time and regularly |
|
user |
set the level of importance to each todo |
urgent matters regarding patients is taken priority of and can be taken care of first |
|
user |
have a list of emergency contacts |
I will be able to find them easily in times of emergency |
|
user |
be able to organise patient’s paperwork (appointment letters for checkups) |
my patients don’t miss their appointments |
|
user |
have a notification system |
I will be reminded of important matters to settle |
|
user |
be able to import and export my app data patient-by-patient |
I can share with other nurses or manager |
|
user |
have an undo function |
I don’t accidentally make irreversible changes due to my mistakes |
|
user |
have a pin login system |
my patients’ information will be kept private |
|
user |
have my patients’ information encrypted |
their information is kept private and secure |
|
user |
be able to see all the patient’s information in a structured format |
so that messy and complex details are presented to me in an organised manner |
|
user |
have an autocomplete function |
I can use the application more quickly without memorising all the commands of the application |
|
user |
have a help function |
I do not need to worry about memorising all the commands of the application |
|
user |
assign each patient a priority number |
I can keep track of who needs me the most |
|
user |
hide private contact details by default |
minimize chance of someone else seeing them by accident |
|
user |
solve the Travelling CN problem |
I can save time when visiting my patients |
|
user |
sort my patient list by priority |
I can keep in mind who to visit |
|
user |
keep track of each patient’s available times |
I know when I can visit them |
Appendix C: Use Cases
(For all use cases below, the System is the PatientBook and the Actor is the user, unless specified otherwise)
Use case: Add patient
MSS
-
User requests to add a new patient to the list
-
Application adds the patient to the list
Use case ends.
Extensions
-
1a. The list is empty.
Use case ends.
-
1a. The one or more given parameters are invalid.
-
1a1. Application shows an error message.
Use case ends.
-
Use case: Delete patient profile
MSS
-
User requests to list persons
-
Application shows a list of persons
-
User requests to delete a specific patient in the list
-
Application delete the specified patient profile
Use case ends.
Extensions
-
2a. The list is empty.
Use case ends.
-
3a. The one or more given parameters are invalid.
-
3a1. Application shows an error message.
Use case resumes at step 2.
-
Use case: Adding an appointment
MSS
-
User requests to list persons
-
Application shows a list of persons
-
User picks one patient from the list and add appointment date and time through command line
-
Application adds user appointment
Use case ends.
Extensions
-
2a. The list is empty.
Use case ends.
-
3a. The one or more given parameters are invalid.
-
3a1. Application shows an error message.
Use case resumes at step 2.
-
Appendix D: Non Functional Requirements
-
Should work on any mainstream OS as long as it has Java 11 or above installed
-
Should be able to hold up to 50 patient profile without any noticeable performance issue
-
Users should be able to understand how to use the system easily
-
A user with above average typing speed for regular English text (i.e. not code, not system admin commands) should be able to accomplish most of the tasks faster using commands than using the mouse
-
GUI should be straightforward and clear
Appendix F: Instructions for Manual Testing
Given below are instructions to test the app manually.
| These instructions only provide a starting point for testers to work on; testers are expected to do more exploratory testing. |
F.1. Launch and Shutdown
-
Initial launch
-
Download the jar file and copy into an empty folder
-
Double-click the jar file
Expected: Shows the GUI with a set of sample contacts. The window size may not be optimum.
-
-
Saving window preferences
-
Resize the window to an optimum size. Move the window to a different location. Close the window.
-
Re-launch the app by double-clicking the jar file.
Expected: The most recent window size and location is retained.
-
F.2. Deleting a patient
-
Deleting a patient while all patients are listed
-
Prerequisites: List all patients using the
pat-listcommand. Multiple patients in the list. -
Test case:
pat-delete 1
Expected: First contact is deleted from the list. Details of the deleted contact shown in the status message. Timestamp in the status bar is updated. -
Test case:
pat-delete 0
Expected: No patient is deleted. Error details shown in the status message. Status bar remains the same. -
Other incorrect delete commands to try:
pat-delete,pat-delete x(where x is larger than the list size)
Expected: Similar to previous.
-
F.3. Updating a patient’s Visit Todos
-
Updating a patient’s Visit Todos. Note that this will not update the patient’s visit tasks in an ongoing visit. For more information of the distinction between visit todos and visit tasks, refer to Visit Tutorials in the User Guide.
-
Test case:
pat-edit 1 vt/Check Blood Pressure
Expected: Patient is updated with the new Visit Todo and this is reflected in the status message. -
Test case:
pat-edit 1 vt/
Expected: Patient is updated with no Visit Todos.
-
F.4. Starting a Visit for a patient
-
Starting a visit for a patient.
-
Prerequisite: There is no ongoing visit.
-
Test case:
visit-start 1
Expected: An ongoing visit is begun. -
Prerequisite: There is an ongoing visit.
-
Test case:
visit-start 1
Expected: No visit is begun. An error message will appear in the status message informing user that there is already an ongoing visit.
-
F.5. Updating an ongoing visit
-
Updating an ongoing visit.
-
Prerequisite: There is an ongoing visit, and this visit has at least one visit task.
-
Test case:
visit-now-update f/1 r/Patient is healthy. d/1 140/90mmHg
Expected: Visit is updated. The first visit task is marked as finished with a detail of ""140/90mmHg" and the visit has the remark "Patient is healthy.". This is reflected on the Current Visit tab and in the status message. -
Prerequisite: There is no ongoing visit.
-
Test case:
visit-now-update [any argument]
Expected: No visit is updated. An error message will appear in the status message.
-
Note: If the format of visit-now-update arguments are wrong, the error message will prompt about the format first, before it prompts on whether or not there is an ongoing visit.
F.6. Cancelling a Visit for a patient
-
Cancelling a visit for a patient.
-
Prerequisite: There is an ongoing visit.
-
Test case:
visit-cancel
Expected: The ongoing visit is cancelled. -
Prerequisite: There is no ongoing visit.
-
Test case:
visit-cancel
Expected: No visit is cancelled. An error message will appear in the status message.
-
F.7. Finishing a Visit for a patient
-
Finishing a visit for a patient.
-
Prerequisite: There is an ongoing visit.
-
Test case:
visit-end
Expected: The ongoing visit is finished. The end date time should be indicated in the visit if you check it in the patient’s list of Visits. -
Prerequisite: There is no ongoing visit.
-
Test case:
visit-end
Expected: No visit is finished. An error message will appear in the status message.
-
F.8. Adding an appointment
-
Adding an appointment while all appointments are listed
-
Prerequisites:
-
List all appointments using the
appt-listcommand. Multiple appointments in the list. -
Ensure all the suggested date times below don’t already exist in the appointment book. If they do, try with start and end date times that don’t exist in the appointment list to get the expected results.
-
-
Test case:
appt-add p/1 sdt/01-01-2020 1000 edt/01-01-2020 1200
Expected: Appointment is added to the list (based on its start date and time as the list is sorted by that) with first patient’s details from the list of patients and the input start and end date times. Details of the added appointment shown in the status message. Timestamp in the status bar is updated. -
Test case:
appt-add p/1 sdt/14-02-2020 2000 edt/14-02-2020 2100 rmon/4
Expected: Appointment is added to the list with first patient’s details from the list of patients, the input start and end date times, and recurring frequency of 4 months. The added appointment will be markedrecurringas well. Details of the added appointment shown in the status message. Timestamp in the status bar is updated. -
Test case (two commands):
appt-add p/1 sdt/12-02-2020 2000 edt/12-02-2020 2100 ryr/1
Followed by:
appt-add p/1 sdt/12-02-2020 2000 edt/12-02-2020 2100 rmon/1
Expected: No appointment is added. Error details shown in the status message. Status bar remains the same. -
Test case (two commands):
appt-add p/1 sdt/10-02-2020 2000 edt/12-02-2020 2100
Followed by:
appt-add p/1 sdt/10-02-2020 2000 edt/12-02-2020 2100
Expected: No appointment is added. Error details shown in the status message. Status bar remains the same. -
Other incorrect appointment add commands to try:
appt-add,appt-delete p/x(where x is larger than the patient list size)
Expected: Similar to previous.
-
F.9. Editing an appointment
-
Editing an appointment while all appointments are listed
-
Prerequisites:
-
List all appointments using the
appt-listcommand. Multiple appointments in the list. -
Ensure all the suggested date times below don’t already exist in the appointment book. If they do, try with start and end date times that don’t exist in the appointment list to get the expected results.
-
-
Test case:
appt-edit 1 p/5 sdt/01-01-2020 1000 edt/01-01-2020 1200
Expected: First appointment is edited in the list to fifth patient’s details from the list of patients and the input start and end date times as mentioned. Details of the edited appointment shown in the status message. Timestamp in the status bar is updated. -
Test case:
appt-edit 1 rmon/3
Expected: First appointment is edited in the list to recur by 3 months. If the appointment was previously not recurring, it will be tagged asrecurring. Details of the edited appointment shown in the status message. Timestamp in the status bar is updated. -
Test case:
appt-edit 3 p/0
Expected: No appointment is edited. Error details shown in the status message. Status bar remains the same. -
Other incorrect appointment edit commands to try:
appt-edit,appt-edit x(where x is larger than the appointment list size)
Expected: Similar to previous.
-
F.10. Deleting a non-recurring appointment
-
Deleting a non-recurring appointment while all appointments are listed
-
Prerequisites:
-
List all appointments using the
appt-listcommand. Multiple appointments in the list. -
xth appointment in the appointment list should be a non-recurring appointment, where x is a positive integer.
-
-
Test case:
appt-delete x
Expected: xth appointment is deleted from the list. Details of the deleted appointment shown in the status message. Timestamp in the status bar is updated. -
Test case:
appt-delete 0
Expected: No appointment is deleted. Error details shown in the status message. Status bar remains the same. -
Other incorrect non-recurring appointment delete commands to try:
appt-delete,appt-delete x(where x is larger than the appointment list size)
Expected: Similar to previous.
-
F.11. Deleting a recurring appointment
-
Deleting a recurring appointment while all appointments are listed
-
Prerequisites:
-
List all appointments using the
appt-listcommand. Multiple appointments in the list. -
xth appointment in the appointment list should be a recurring appointment.
-
-
Test case:
appt-delete x
Expected: xth appointment is deleted from the list and the next appointment from xth appointment being recurred is gotten and added to the list. Details of the deleted appointment shown in the status message. Timestamp in the status bar is updated. -
Test case:
appt-delete 0
Expected: No appointment is deleted. Error details shown in the status message. Status bar remains the same. -
Other incorrect recurring appointment delete commands to try:
appt-delete,appt-delete x(where x is larger than the appointment list size)
Expected: Similar to previous.
-
F.12. Deleting an appointment permanently
-
Deleting an appointment permanently while all appointments are listed
-
Prerequisites: List all appointments using the
appt-listcommand. Multiple appointments in the list. -
Test case:
appt-delete-permanent 1
Expected: First appointment is deleted from the list. Details of the deleted appointment shown in the status message. Timestamp in the status bar is updated. -
Test case:
appt-delete-permanent 0
Expected: No appointment is deleted. Error details shown in the status message. Status bar remains the same. -
Other incorrect appointment permanent delete commands to try:
appt-delete-permanent,appt-delete-permanent x(where x is larger than the appointment list size)
Expected: Similar to previous.
-
F.13. Changing of autocomplete suggestion list
-
Changing list from object list to command list.
-
Test case: Type "pat-" into empty command box
Expected: The suggestion list is changed from object list to command list
-
-
Changing list from command list to prefix list.
-
Test case: Type "pat-add" into empty command box
Expected: The suggestion list is changed from command list to prefix list
-
-
Changing list from command list to index list.
-
Prerequisite: At least 1 patient registered in application
-
Test case: Type "pat-edit" into empty command box
Expected: The suggestion list is changed from command list to index list
-
-
Changing list from index list to prefix list.
-
Prerequisite: At least 1 patient registered in application
-
Test case: Type "pat-edit 1" into empty command box
Expected: The suggestion list is changed from index list to prefix list
-
F.14. Updating of current autocomplete suggestion list
-
Updating the object list.
-
Test case: Type "ap" into empty command box
Expected: The suggestion list should only contain "appt-" and "app-" now
-
F.15. Exporting data
-
Export patient data into a CSV file
-
Prerequisite: There are existing patients.
-
Test case:
app-export n/testcase1
Expected: All patient data written to./exports/testcase1.csv. -
Prerequisite: There are existing patients at indexes 1 and 3.
-
Test case:
app-export n/testcase2 i/1 i/3
Expected: Data of patients at index 1 and 3 written to./exports/testcase2.csv.
-
F.16. Importing data
-
Import patient data from a CSV file
-
Prerequisite:
./imports/testcase3.csvexists and contains some patient data in the correct format. -
Test case:
app-import-replace n/testcase3
Expected: All patient data is replaced with patients fromtestcase3.csv. -
Prerequisite:
./imports/testcase4.csvexists and contains only new patient data in the correct format. -
Test case:
app-import-merge n/testcase3
Expected: All patients intestcase4.csvadded into the app.
-
F.17. Viewing the command history:
-
Viewing the command history.
-
Prerequisite: None.
-
Test case:
pat-list
Expected: No change to the history panel.
-
-
Prerequisites: List all patients using the
pat-listcommand. At least one patient in the list. No ongoing visit.-
Test case:
pat-delete 1
Expected:pat-delete 1appears in the history panel at the bottom of the list with the greatest index number.
-
-
F.18. Undoing a command:
-
Undoing a command.
-
Prerequisite: There are commands in the history.
-
Test case:
app-undo
Expected: The previous command in the history is undone. -
Test case:
app-undo 1
Expected: All commands in the history are undone.
-
-
Prerequisite: There are no commands in the history.
-
Test case:
app-undo
Expected: No command is undone. An error message appears in the status box. -
Test case:
app-undo 1
Expected: No command is undone. An error message appears in the status box.
-
-
F.19. Redoing a command:
-
Redoing a command.
-
Prerequisite:
app-undois the last successful data-modifying command.-
Test case:
app-redo
Expected: The undone command is redone.
-
-
Prerequisite:
app-undois not the last successful data-modifying command.-
Test case:
app-redo
Expected: No command is redone. An error message appears in the status box.
-
-